



Lab1-Report
md12 kBSolution of TP 1: Hadoop
IN411- Lab 1- Hadoop - HDFS
Lab Report:
- Student: Hadi Hijazi
- Course: IN411- Introduction to Big Data
- Submitted to: Dr. Mohammad Hamze
Note on Environment
The lab instructions were designed for a native Windows setup. However, this lab was completed using WSL (Windows Subsystem for Linux) running Ubuntu, which provides a full Linux environment on Windows. All steps were adapted accordingly — replacing .cmd scripts with their Linux equivalents (.sh scripts), and using Linux-style paths and configuration. The end result is functionally identical: a fully working pseudo-distributed Hadoop cluster with HDFS operational and accessible via the same web GUIs.
Due to differences between WSL and native Windows, a few extra configuration steps were required and are clearly marked throughout this report.
Objectives
- Install Java JDK 8
- Download and install Apache Hadoop 3.4.2
- Configure Hadoop for pseudo-distributed mode
- Format and start HDFS (NameNode + DataNode)
- Start YARN (ResourceManager + NodeManager)
- Create directories and upload files to HDFS
- Verify the setup via command-line and Web GUI
Environment
| Component | Details |
|---|---|
| OS | Windows 11 with WSL2 (Ubuntu) |
| Java | OpenJDK 8 (java-8-openjdk-amd64) |
| Hadoop Version | 3.4.2 |
| Mode | Pseudo-distributed (single node) |
| HADOOP_HOME | /home/hadihz/hadoop |
Step 1 - Install Java JDK 8
Java 8 is required by Hadoop. It was installed inside WSL using:
sudo apt-get install -y openjdk-8-jdkVerify the installation:
java -version
# java version "1.8.0_482"
Step 2 - Download and Extract Apache Hadoop
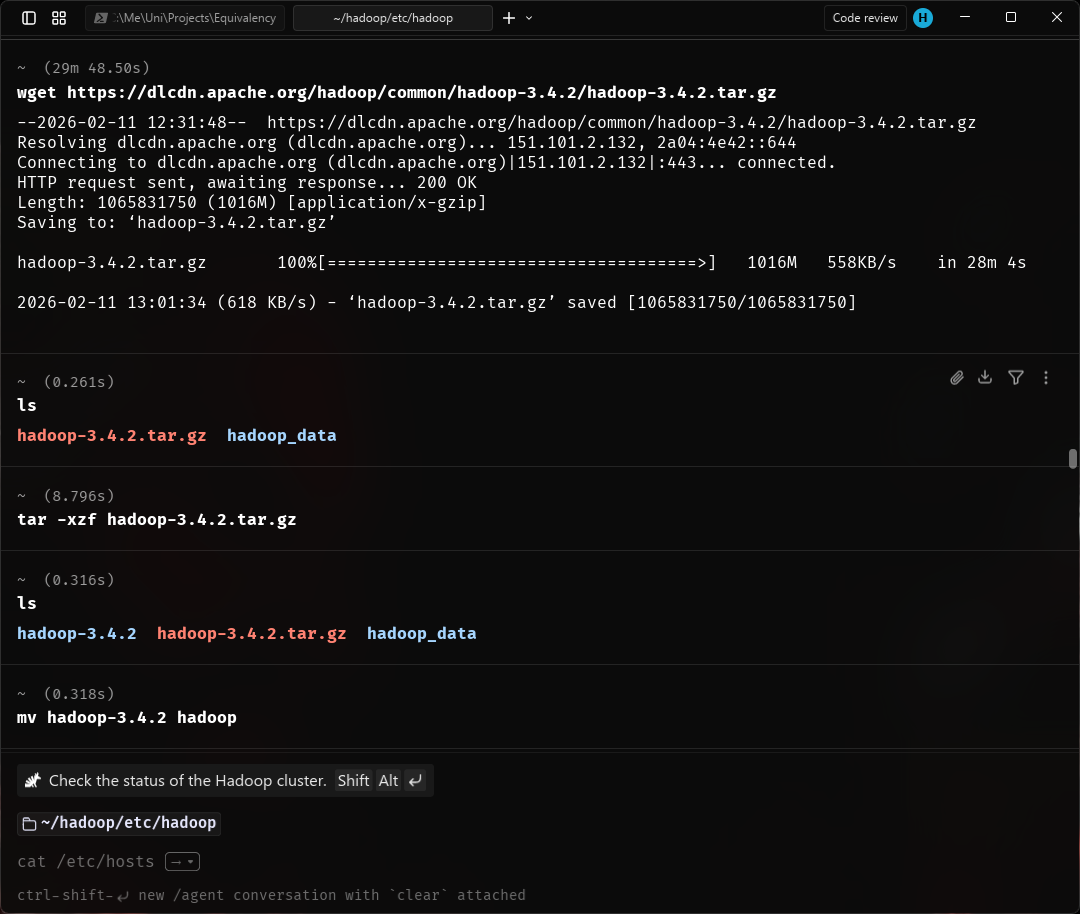
Hadoop 3.4.2 was downloaded directly inside WSL:
wget https://dlcdn.apache.org/hadoop/common/hadoop-3.4.2/hadoop-3.4.2.tar.gz
tar -xzf hadoop-3.4.2.tar.gz
mv hadoop-3.4.2 hadoop
Windows equivalent: On native Windows, you would download the
.tar.gzand extract it using WinRAR run as Administrator, then place the folder at a path likeC:\hadoop.
Step 3 - Set Environment Variables
Environment variables were added to ~/.bashrc:
nano ~/.bashrcThe following lines were appended:
# Java
export JAVA_HOME=/usr/lib/jvm/java-8-openjdk-amd64
export PATH=$PATH:$JAVA_HOME/bin

# Hadoop
export HADOOP_HOME=/home/hadihz/hadoop
export PATH=$PATH:$HADOOP_HOME/bin:$HADOOP_HOME/sbin
export HADOOP_CONF_DIR=$HADOOP_HOME/etc/hadoop
Then reload:
source ~/.bashrc⚙️ Extra Step (WSL only) — Set JAVA_HOME in hadoop-env.sh
On WSL, Hadoop starts its services through SSH, which opens a non-interactive shell that does not load .bashrc. This caused the following error when starting Hadoop:
ERROR: JAVA_HOME is not set and could not be found.The fix was to set JAVA_HOME directly inside Hadoop's own environment file:
nano $HADOOP_HOME/etc/hadoop/hadoop-env.shLine added:
export JAVA_HOME=/usr/lib/jvm/java-8-openjdk-amd64This ensures JAVA_HOME is always available regardless of how the process is launched.
Step 4 - Create HDFS Data Directories
mkdir -p ~/hadoop_data/hdfs/namenode
mkdir -p ~/hadoop_data/hdfs/datanode
These directories store the NameNode metadata and DataNode data blocks respectively.
Step 5 - Configure Hadoop XML Files
All configuration files are located in $HADOOP_HOME/etc/hadoop/.
core-site.xml
Defines the default filesystem address:
<configuration>
    <property>
        <name>fs.defaultFS</name>
        <value>hdfs://localhost:9000</value>
    </property>
</configuration>
hdfs-site.xml
Sets replication factor and storage paths:
<configuration>
    <property>
        <name>dfs.replication</name>
        <value>1</value>
    </property>
    <property>
        <name>dfs.namenode.name.dir</name>
        <value>file:///home/hadihz/hadoop_data/hdfs/namenode</value>
    </property>
    <property>
        <name>dfs.datanode.data.dir</name>
        <value>file:///home/hadihz/hadoop_data/hdfs/datanode</value>
    </property>
</configuration>
mapred-site.xml
Specifies the MapReduce framework:
<configuration>
    <property>
        <name>mapreduce.framework.name</name>
        <value>yarn</value>
    </property>
</configuration>
Note: In Hadoop 3.x, the file
mapred-site.xml.templateno longer exists. The file was created directly usingnano mapred-site.xml.
yarn-site.xml
Configures the NodeManager auxiliary service:
<configuration>
    <property>
        <name>yarn.nodemanager.aux-services</name>
        <value>mapreduce_shuffle</value>
    </property>
</configuration>
Step 6 - Set Up Passwordless SSH
⚙️ Extra Step (WSL only) — On native Windows,
start-dfs.cmdlaunches services directly. On WSL, Hadoop uses SSH to start each service even on the same machine, simulating how it would connect to remote worker nodes in a real cluster.
OpenSSH was installed and configured for passwordless local access:
sudo apt-get install -y openssh-server
ssh-keygen -t rsa -P "" -f ~/.ssh/id_rsa
cat ~/.ssh/id_rsa.pub >> ~/.ssh/authorized_keys
chmod 600 ~/.ssh/authorized_keys
sudo service ssh start
ssh localhost   # tested successfully
Without this step, every start-dfs.sh call would fail with:
ssh: connect to host localhost port 22: Connection refusedStep 7 - Format the NameNode
Before first use, the NameNode must be formatted (similar to formatting a disk). This initializes the HDFS metadata storage:
hdfs namenode -formatKey output confirming success:
Storage directory /home/hadihz/hadoop_data/hdfs/namenode has been successfully formatted.This command should only be run once. Running it again on an existing cluster would wipe all HDFS metadata and data.
Step 8 - Start Hadoop Services
start-dfs.sh
start-yarn.sh
Windows equivalent:
start-dfs.cmdandstart-yarn.cmdrun as Administrator.
Verify all services are running:
jpsExpected output:
NameNode
DataNode
SecondaryNameNode
ResourceManager
NodeManager
Step 9 - Create HDFS Directory and Upload a File
Create a directory named bigdata
hadoop fs -mkdir /bigdata
hadoop fs -ls /
Output:
Found 1 items
drwxr-xr-x   - hadihz supergroup          0 2026-02-11 13:32 /bigdata
Create and upload myfile.txt
echo "Hello Hadoop!" > myfile.txt
hadoop fs -put myfile.txt /bigdata
hadoop fs -ls -R /
Output:
drwxr-xr-x   - hadihz supergroup          0 2026-02-11 13:33 /bigdata
-rw-r--r--   1 hadihz supergroup         14 2026-02-11 13:33 /bigdata/myfile.txt
Step 10 - HDFS Command Reference
| Command | Description |
|---|---|
hadoop fs -mkdir /path |
Create a directory in HDFS |
hadoop fs -ls /path |
List contents of an HDFS directory |
hadoop fs -ls -R / |
Recursively list all HDFS contents |
hadoop fs -put localfile /hdfs/path |
Upload a local file to HDFS |
hadoop fs -get /hdfs/path localfile |
Download a file from HDFS |
hadoop fs -cat /hdfs/path/file |
Print file contents from HDFS |
hadoop fs -rm /hdfs/path/file |
Delete a file from HDFS |
hadoop fs -rmdir /hdfs/path |
Delete an empty HDFS directory |
hadoop fs -mv /src /dest |
Move/rename a file in HDFS |
hadoop fs -cp /src /dest |
Copy a file within HDFS |
hadoop fs -du -h /path |
Show disk usage of HDFS path |
hdfs dfsadmin -report |
Show cluster health and DataNode status |
Step 11 - Web GUI Access
Both web interfaces were accessed from the Windows browser while Hadoop ran inside WSL — the ports are automatically forwarded by WSL2.
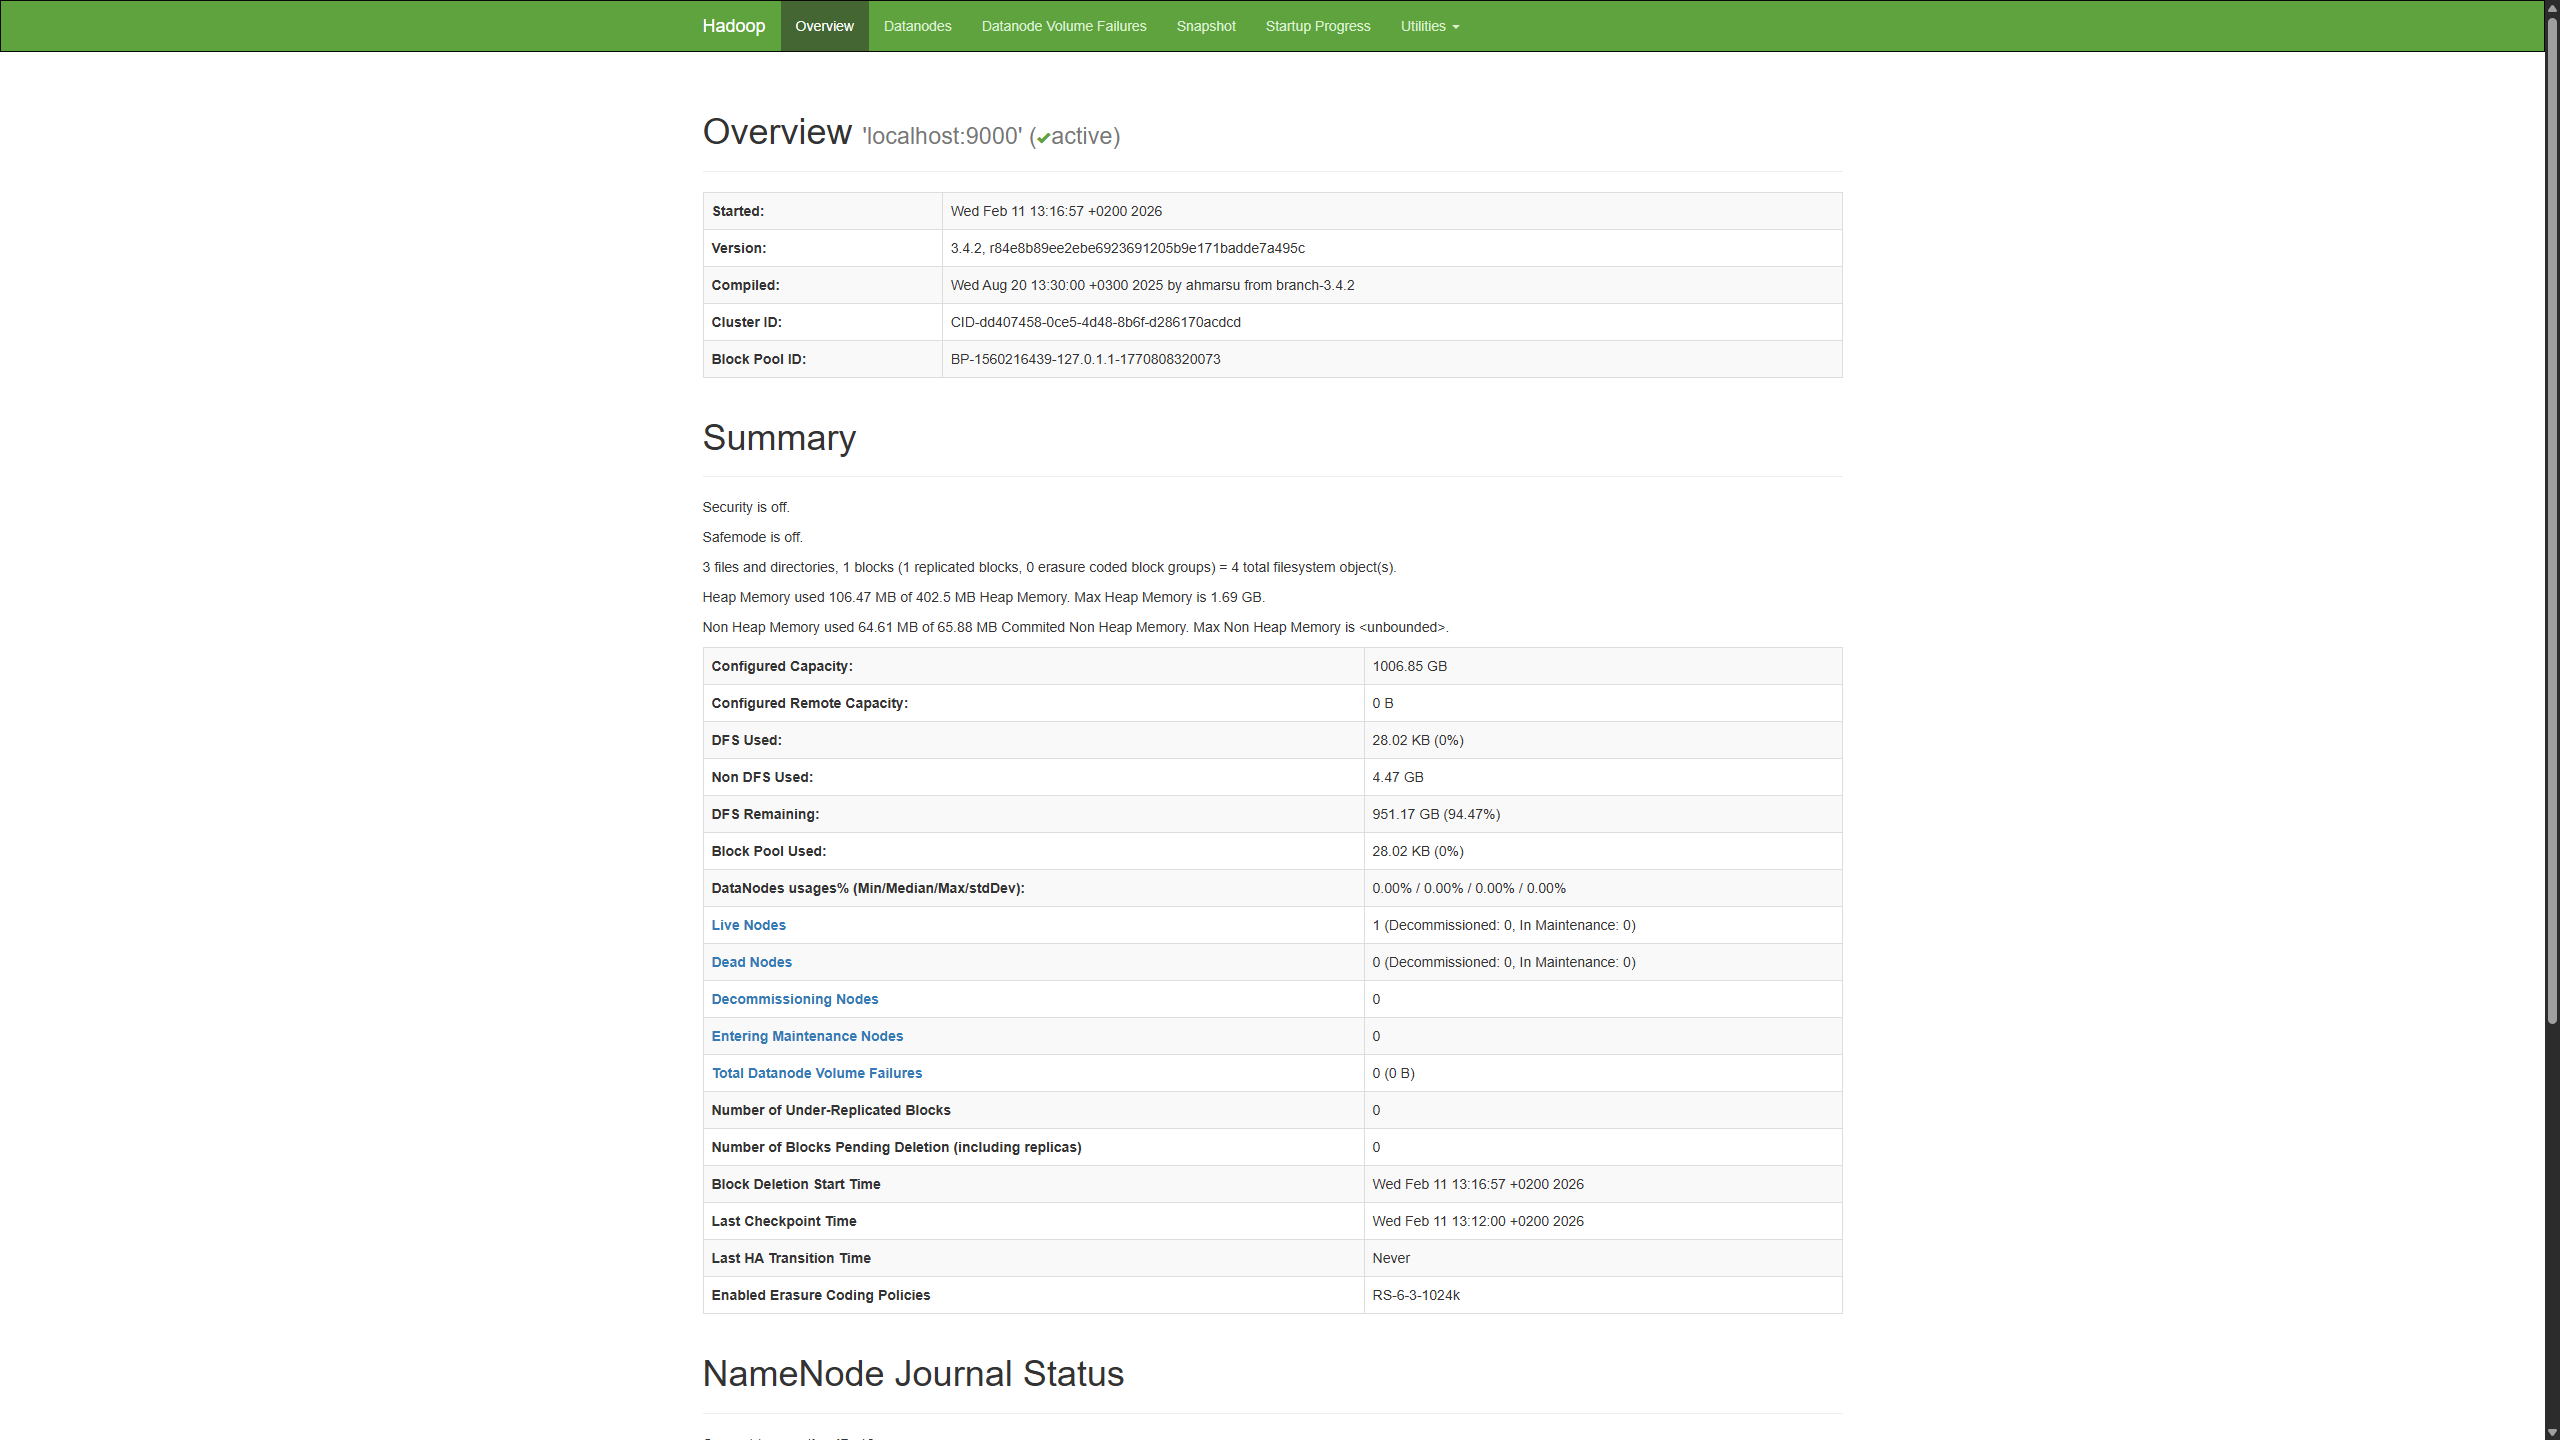
NameNode UI - http://localhost:9870
Displays the HDFS filesystem: live DataNodes, disk usage, replication status, and the ability to browse files and directories.
ResourceManager UI - http://localhost:8088
Displays YARN cluster status: running applications, node health, and resource allocation.

Extra Steps — WSL Web GUI Fixes
The web GUIs loaded correctly in the browser, but two issues were encountered specific to the WSL environment that required additional configuration.
⚙️ Fix 1 — File Download Failing (Hostname Resolution)
When attempting to download a file from the NameNode UI at localhost:9870, the browser was redirected to a URL using the machine's hostname (<hostname>) instead of localhost. Since this hostname is not resolvable from the Windows browser, the download failed.
Root cause: HDFS uses the system hostname to advertise the DataNode's address for data transfer. In WSL, this hostname resolves internally but not from the Windows-side browser.
Fix: The following properties were added to hdfs-site.xml to force localhost for all data transfer URLs:
<!-- Fix for WSL hostname resolution -->
<property>
    <name>dfs.datanode.hostname</name>
    <value>localhost</value>
</property>
<property>
    <name>dfs.client.use.datanode.hostname</name>
    <value>false</value>
</property>
After restarting HDFS (stop-dfs.sh then start-dfs.sh), file downloads from the UI worked correctly.
⚙️ Fix 2 — File Upload Failing (Permissions)
Uploading a file through the NameNode web UI failed silently. The issue was that the web UI performs uploads as a default system user called dr.who, which does not have write permissions on the HDFS directories owned by hadihz.
Fix: The following properties were added to configure the web UI to act as the correct user.
In core-site.xml:
<!-- Allow the web UI to act as the correct user -->
<property>
    <name>hadoop.http.staticuser.user</name>
    <value>hadihz</value>
</property>
<property>
    <name>hadoop.proxyuser.hadihz.hosts</name>
    <value>*</value>
</property>
<property>
    <name>hadoop.proxyuser.hadihz.groups</name>
    <value>*</value>
</property>
In hdfs-site.xml:
<!-- Enable WebHDFS for UI file operations -->
<property>
    <name>dfs.webhdfs.enabled</name>
    <value>true</value>
</property>
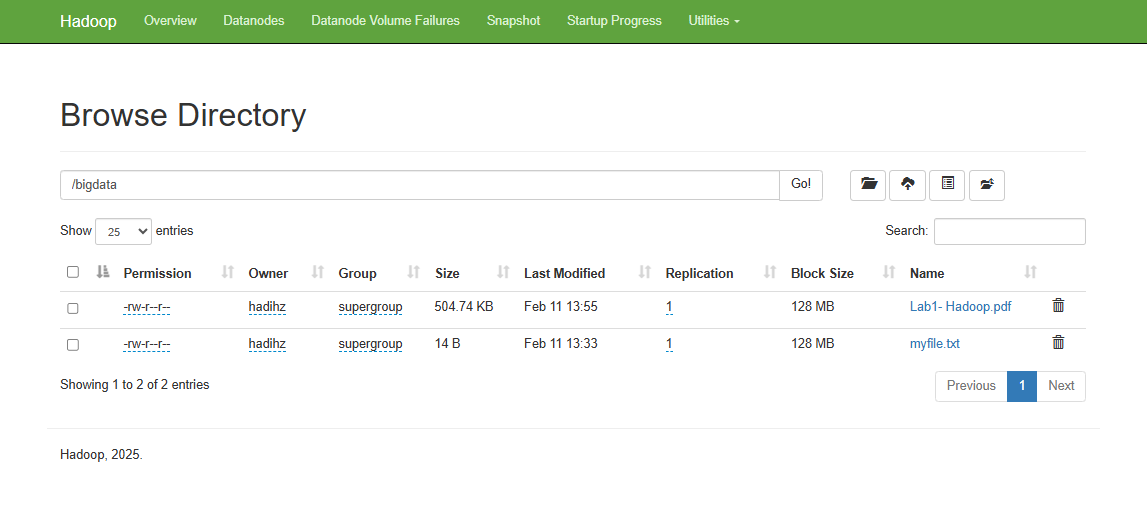
After restarting HDFS, both file upload and download from the web UI worked correctly.
Conclusion
A fully functional pseudo-distributed Hadoop cluster was successfully set up inside WSL Ubuntu on Windows. All lab objectives were completed:
- Hadoop 3.4.2 was installed and configured
- HDFS was formatted and started (NameNode + DataNode)
- YARN was started (ResourceManager + NodeManager)
- A
/bigdatadirectory was created in HDFS - A file
myfile.txtwas uploaded and verified in HDFS - Both web GUIs are accessible at
localhost:9870andlocalhost:8088
The WSL approach offers an advantage over native Windows setup: it provides a true Linux environment which is the native platform for Hadoop, avoiding many Windows-specific compatibility issues. The few extra steps required — SSH setup, JAVA_HOME in hadoop-env.sh, and hostname/permissions fixes for the web UI — are well-documented and straightforward to resolve.