



Docker_Lab_Report
md14 kBSolution of Lab 1: Docker
Docker Lab Report
Course: IN401- Cloud Computing
Lab: Virtualization with Docker Engine - OS-Level Virtualization
Instructor: Dr. Mohammad Hamze
Date: 13/11/2025
1. Team Information
| Member | Name | Student ID | Section |
|---|---|---|---|
| Student 1 | Hadi Hijazi | 105174 | French |
2. Lab Objectives
The purpose of this lab was to get hands-on experience with Docker as an OS-level virtualization tool on Windows 11. Concretely, we were asked to:
- Install and configure Docker Engine on Windows.
- Enable container-related features (Hyper-V, Windows containers).
- Run and manage containers from images pulled from Docker Hub.
- Deploy a simple web application inside a container.
- Reflect on the suitability of Docker for building applications (Java/Python or web apps in general).
3. Environment & Prerequisites
For this lab, I worked on a Windows 11 machine (though the same steps should work on Windows 10). Here's what I needed:
- Virtualization: Intel VT-x enabled in BIOS
- Container Runtime: Docker Desktop for Windows with Hyper-V
- Command Line: PowerShell running as Administrator
- Internet Access: to pull images from Docker Hub
I also followed the official Docker Curriculum material that was referenced in the lab instructions.
4. Installation & Setup Steps
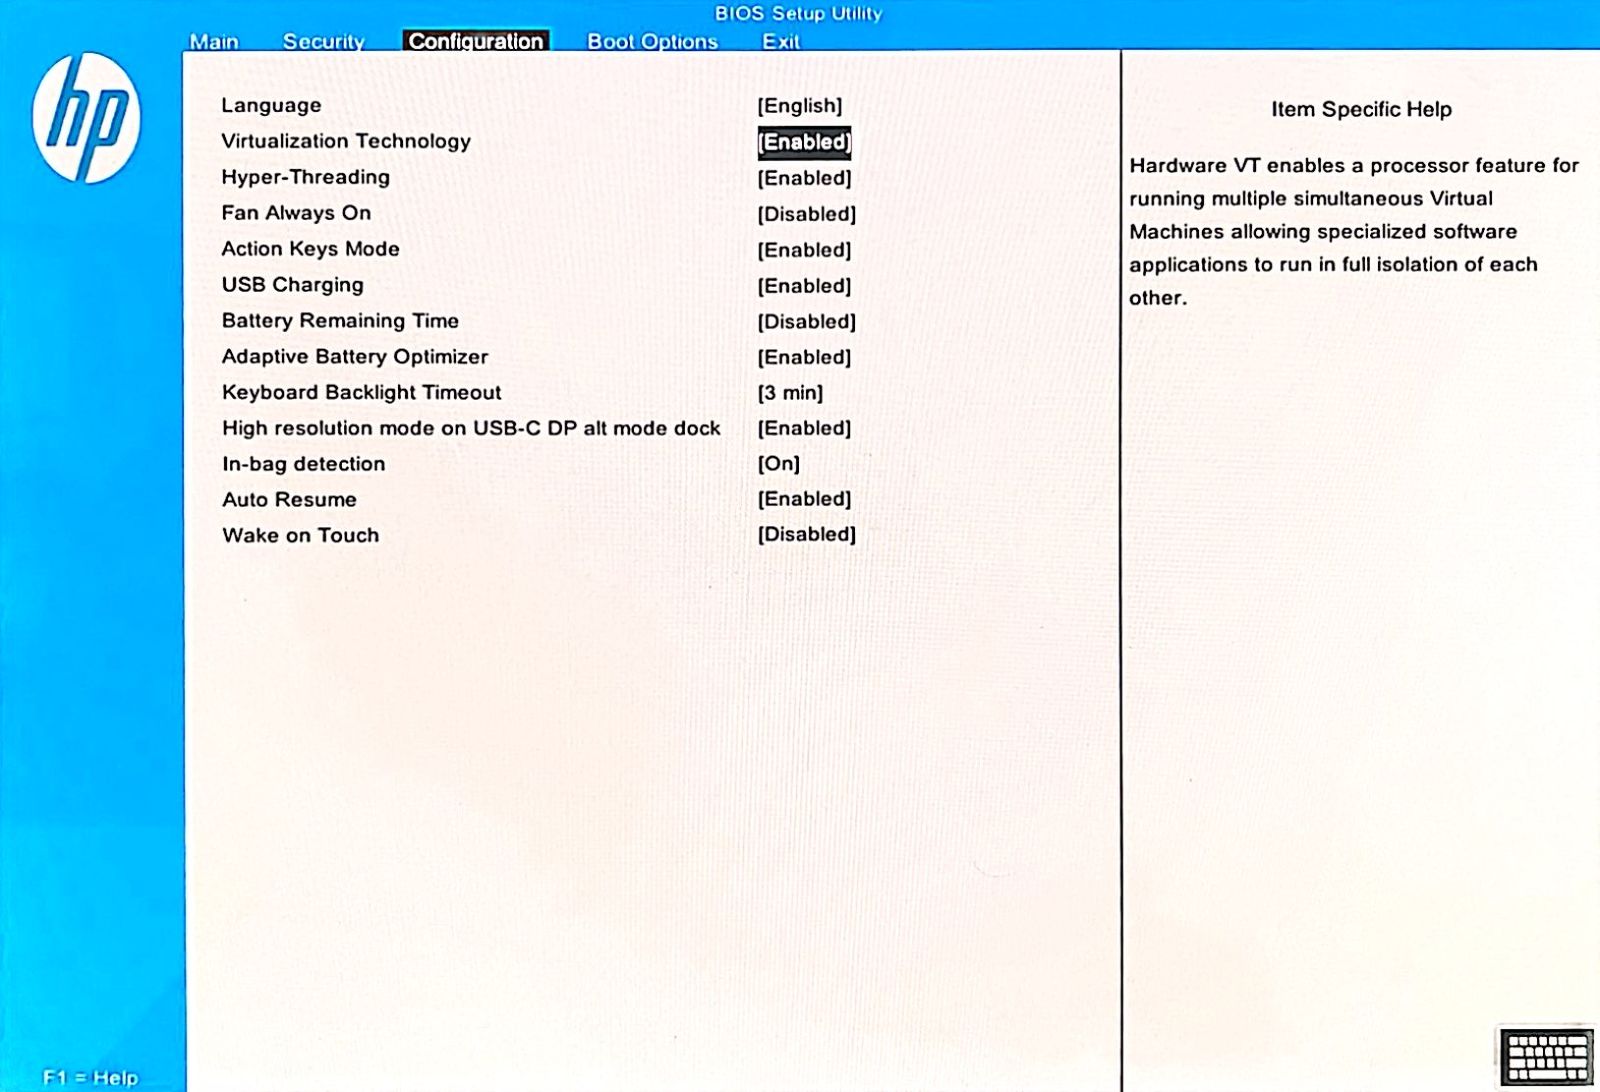
4.1 Enabling CPU Virtualization in BIOS
Before I could use Docker, I needed to enable hardware virtualization. Here's what I did:
- Restarted the computer and pressed F10 during boot to enter the BIOS setup.
- Found the Intel Virtualization Technology (VT-x) option in the CPU settings.
- Enabled it and saved the changes before exiting.
This was necessary because Windows needs Hyper-V to run Docker containers efficiently, and Hyper-V requires hardware virtualization support.
4.2 Installing Docker Desktop on Windows
The installation process was pretty straightforward:
- I went to Docker Hub (hub.docker.com) and downloaded Docker Desktop for Windows.
- Ran the installer and accepted the default settings, which included enabling Hyper-V and installing necessary Windows components.
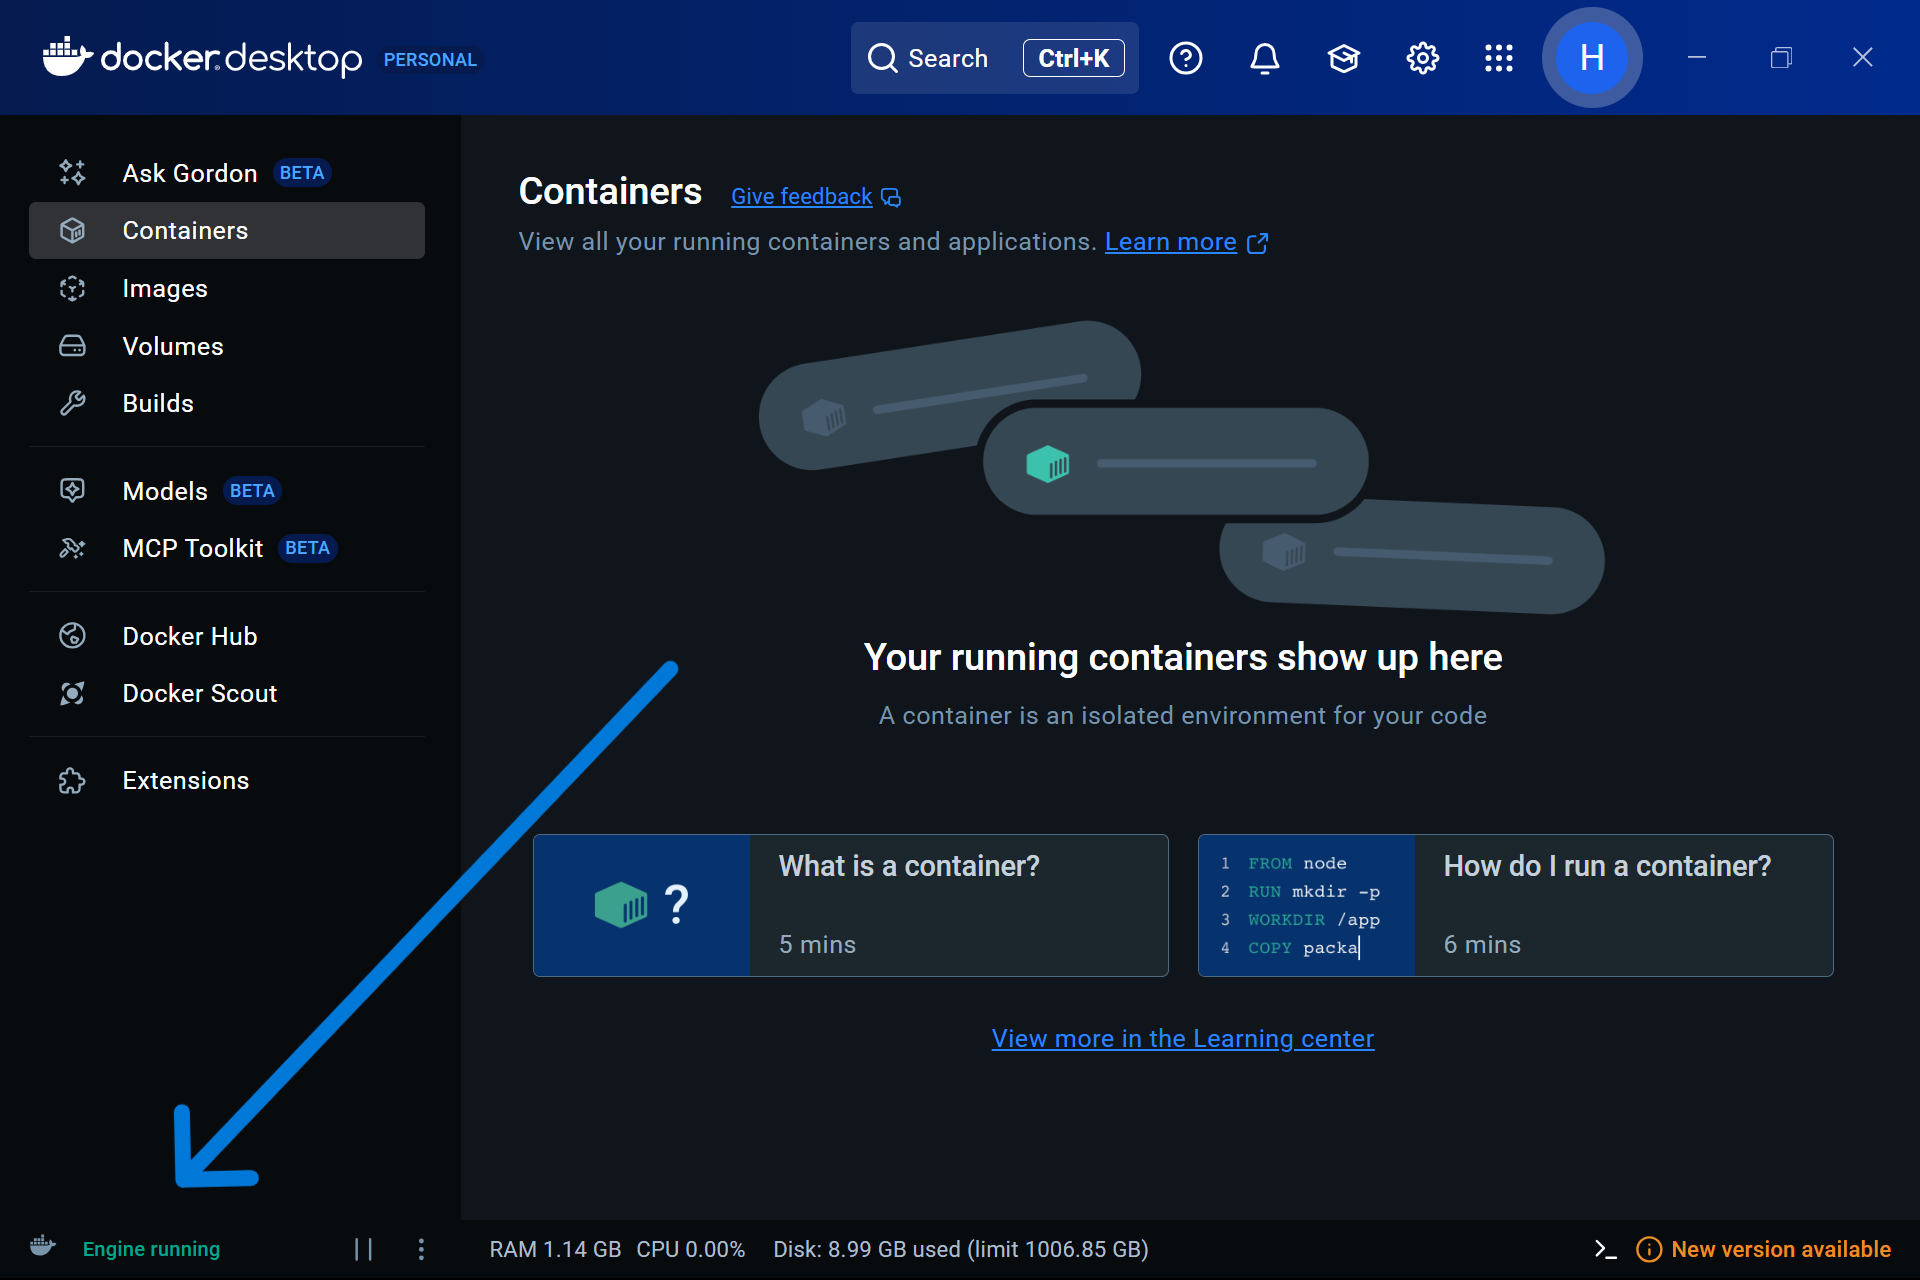
- After installation finished, I launched Docker Desktop and waited for it to initialize.
- Once I saw the "Docker Engine is running" status, I knew I was good to go.
4.3 Enabling Windows Features for Docker
My system was running Windows Home, which doesn't natively support the full containers feature, so I needed to set up WSL 2 (Windows Subsystem for Linux). I opened PowerShell as Administrator and ran:
wsl --install
This command installs WSL 2 and configures everything Docker needs to run properly. After it finished, we had to restart the computer for the changes to take effect.
5. Verifying Docker with Basic Containers
5.1 hello-world Image
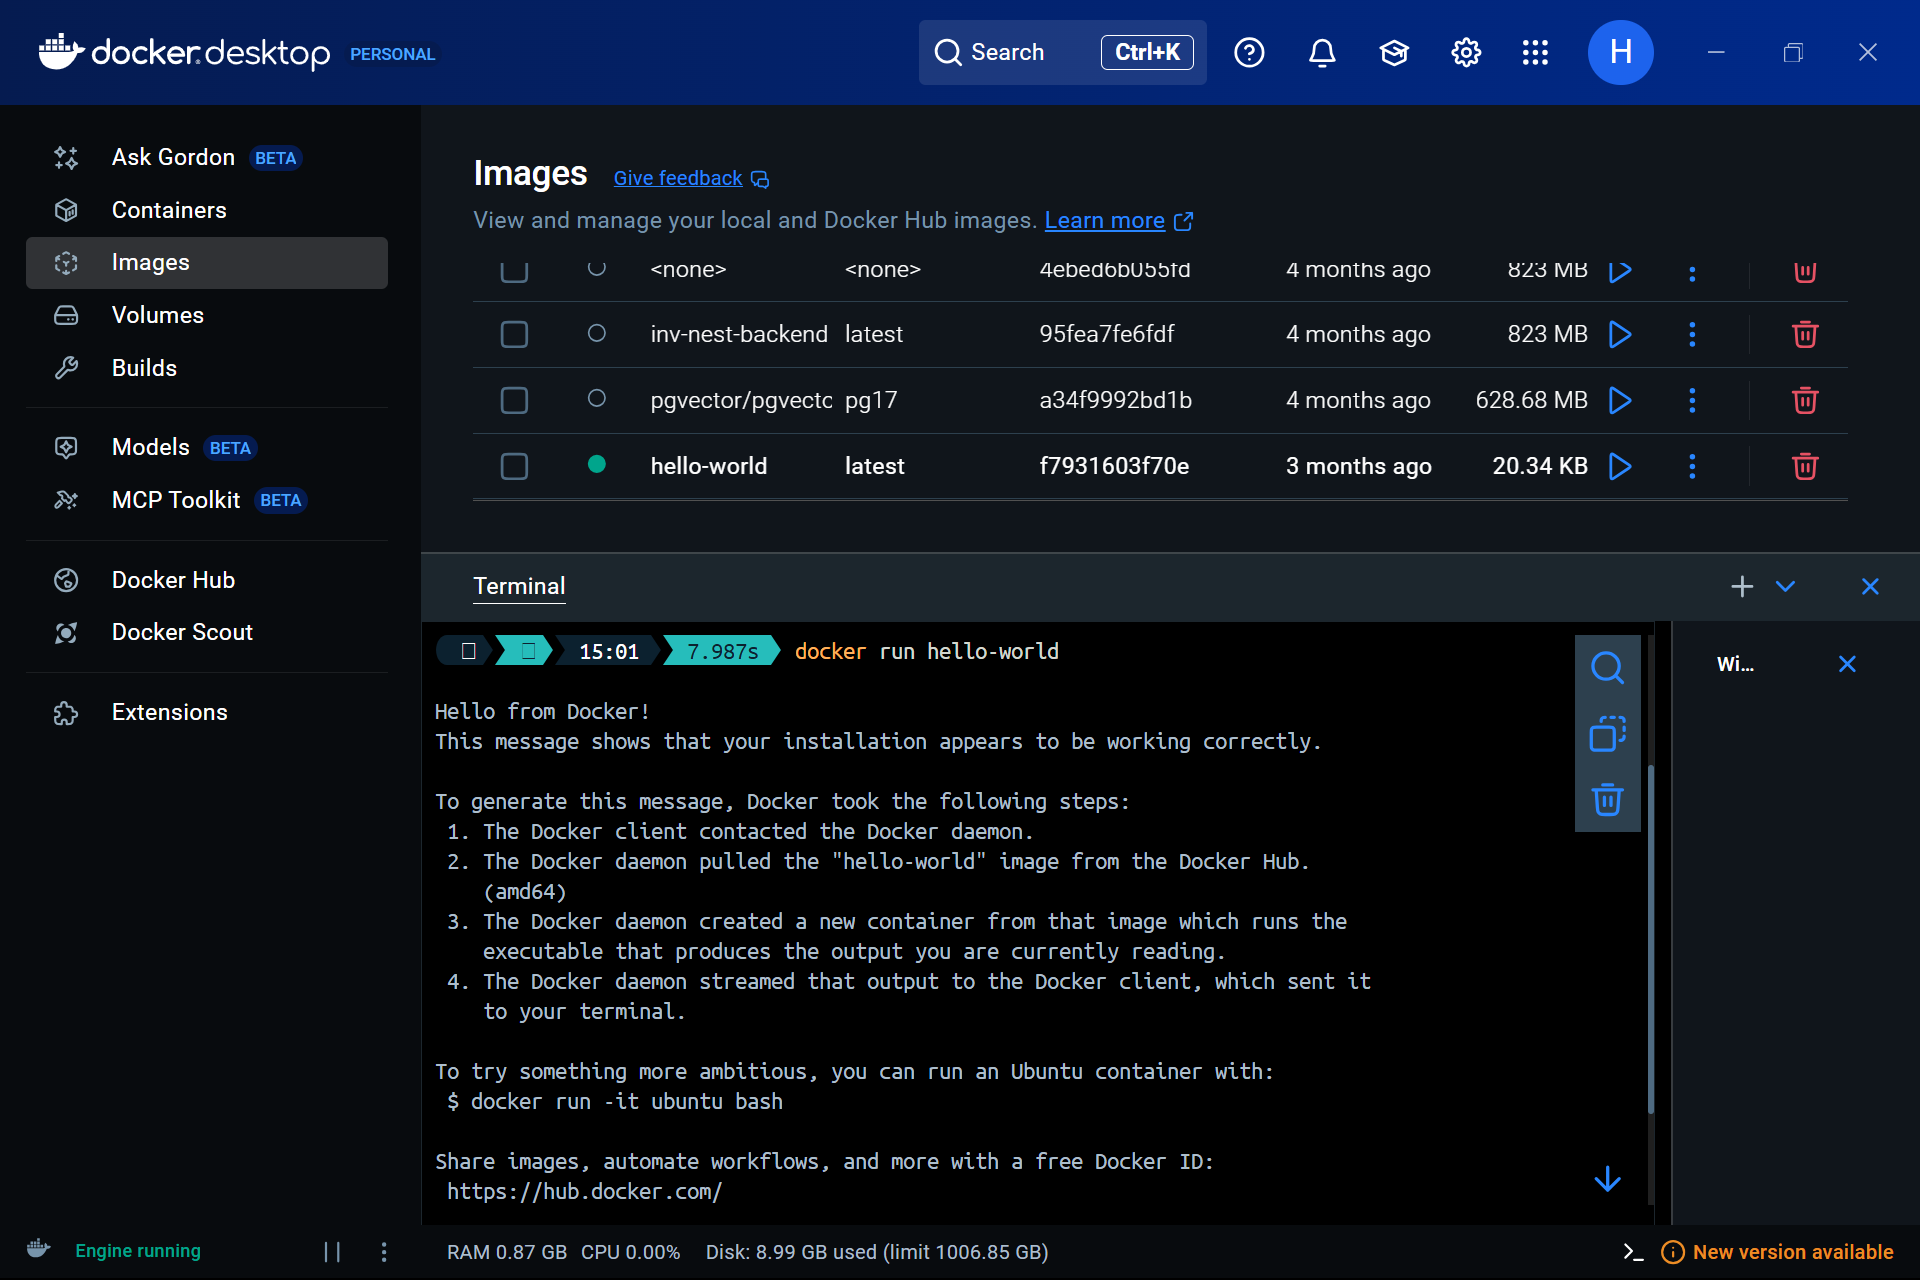
To verify the Docker installation, I pulled and ran the official hello-world image.
docker pull hello-world
docker run hello-world
docker pull hello-worlddownloads the image from Docker Hub.docker run hello-worldstarts a new container from that image and executes a small test program.
Observed output (summary):
Docker printed a short message:
-
Greeting (“Hello from Docker!”).
-
Explanation of what it did internally:
- Checked for the image locally.
- Pulled it from the registry.
- Created a container.
- Ran the program inside the container.
- Printed the message and exited.
This confirmed that the Docker Engine, networking, and basic functionality were working correctly.
5.2 Working with the busybox Image
Next, I used the lightweight BusyBox image to understand how containers behave.
5.2.1 Running BusyBox Without a Command
docker run busybox-
Docker:
- Located/pulled the
busyboximage. - Started a container.
- Since no command was given, it ran the default command and then immediately exited.
- Located/pulled the
This showed that containers are ephemeral by default: if there’s nothing to keep them running, they simply stop.
5.2.2 Running BusyBox With a Command
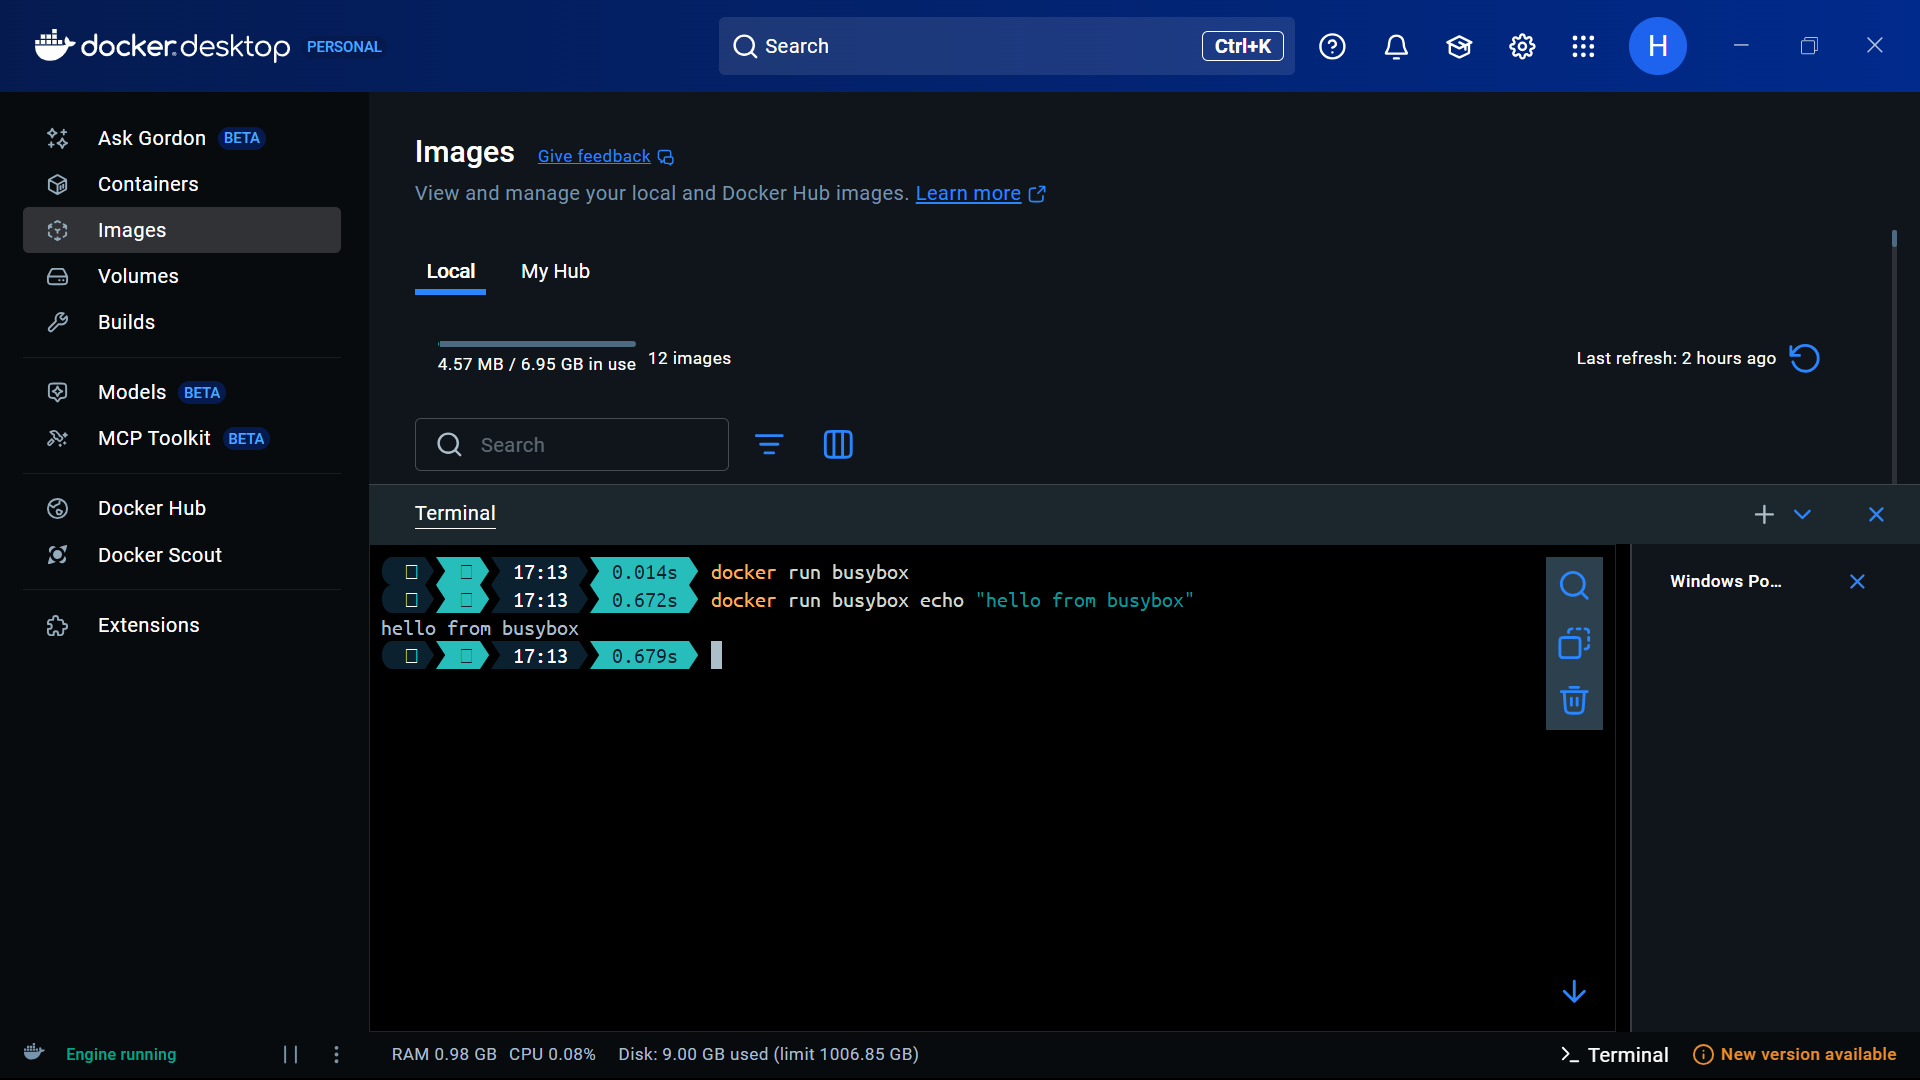
docker run busybox echo "hello from busybox"Here, Docker:
- Started a new container from
busybox. - Executed the
echo "hello from busybox"command. - Printed the text.
- Exited.
This illustrated how containers can be used to run small, isolated tasks very quickly.
5.3 Inspecting and Managing Containers
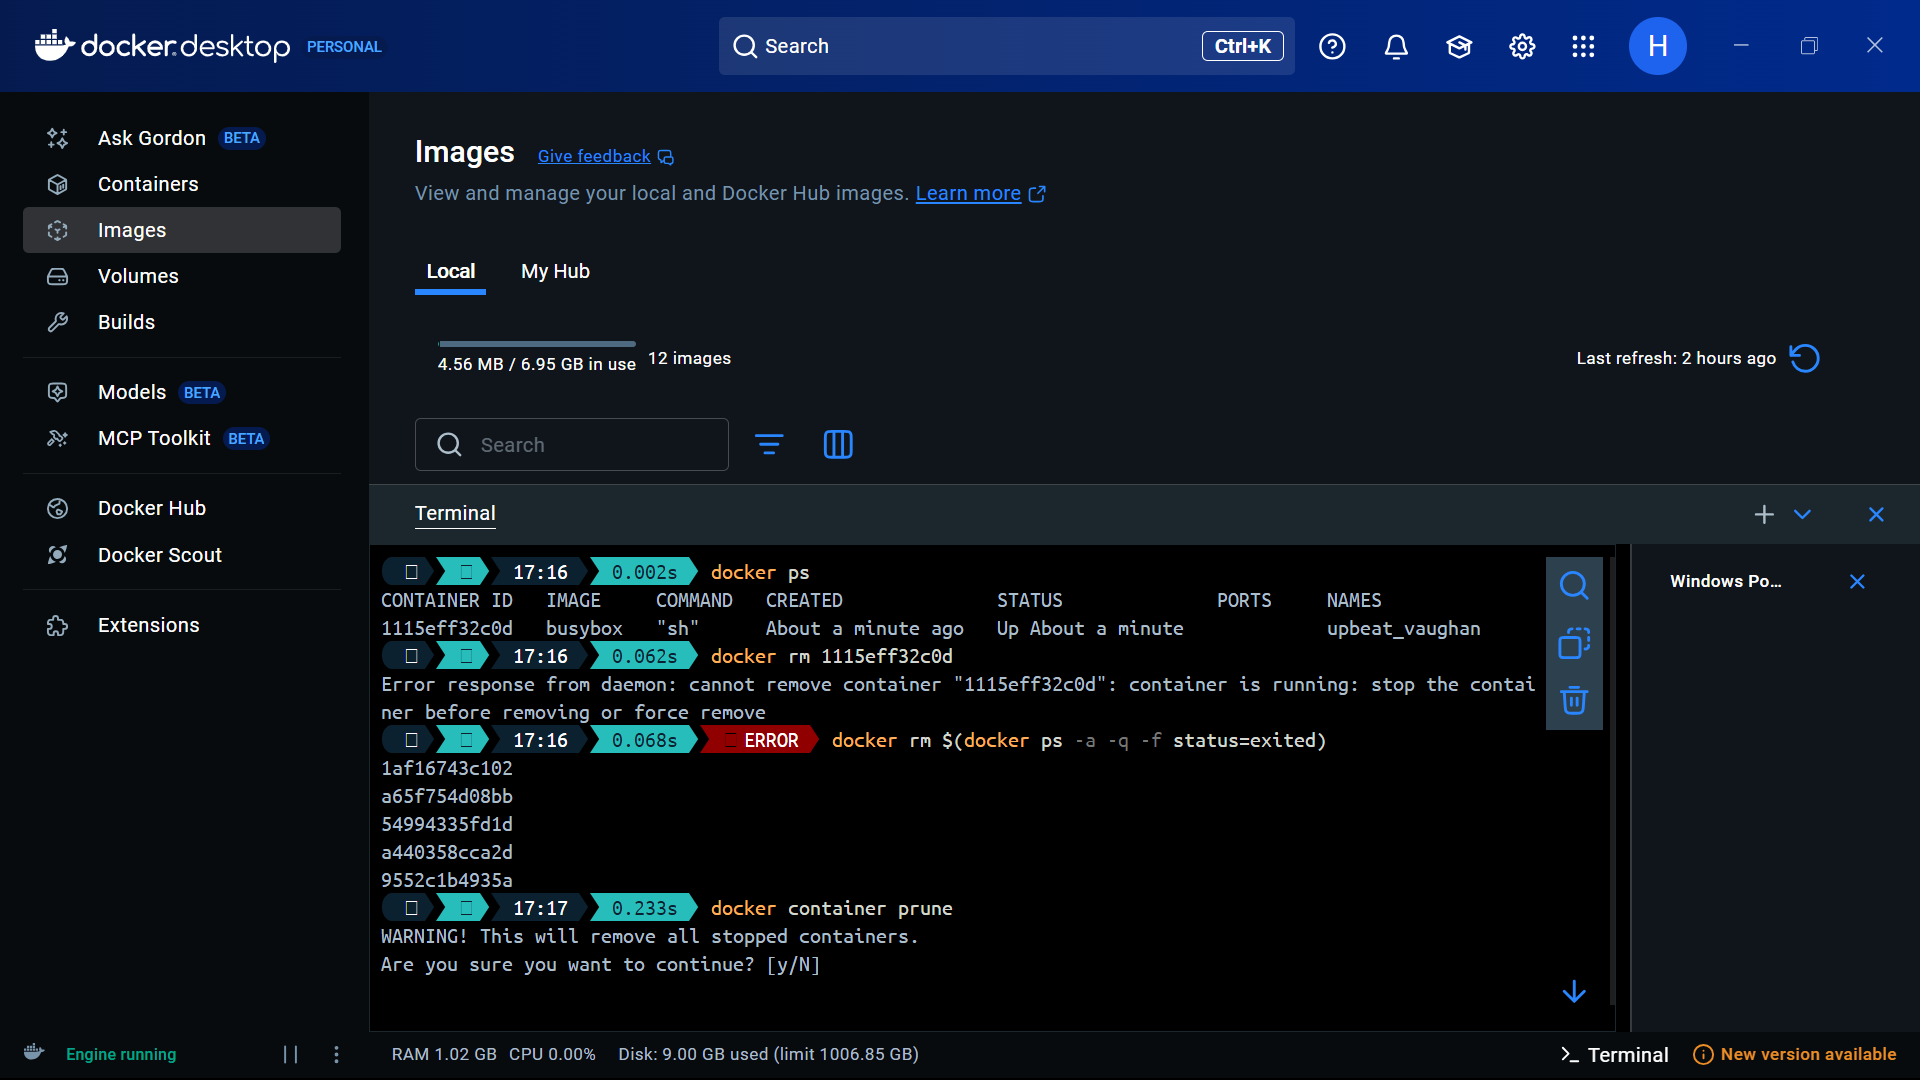
After playing around with BusyBox, I wanted to learn how to actually manage containers. Here are the main commands I practiced:
-
See what's currently running:
docker ps -
See all containers (including stopped ones):
docker ps -a -
Start an interactive shell inside a container:
docker run -it busyboxThis dropped me into a BusyBox shell where I could run commands like
lsandpwd. The-iflag keeps the input stream open, and-tgives me a proper terminal interface. -
Delete a specific container:
docker rm <CONTAINER_ID> -
Clean up all stopped containers at once:
docker rm $(docker ps -a -q -f status=exited)Or more simply:
docker container prune
Going through these commands helped me understand the container lifecycle—how to create them, check their status, and clean them up when I'm done.
6. Docker Terminology (Short Summary)
Throughout the lab, I kept running into some Docker-specific terms. Here's a quick rundown of the main concepts:
-
Image: Think of this as a blueprint or template. It's a read-only package that contains everything needed to run an application—the code, runtime, libraries, and configuration files.
-
Container: A running (or stopped) instance of an image. It's like taking that blueprint and bringing it to life. Containers are lightweight and run in isolation from both the host system and other containers.
-
Docker Daemon: The background service that does all the heavy lifting—managing images, containers, networks, and storage volumes. It's always running on the host machine.
-
Docker Client: The command-line tool I use to interact with Docker (the
dockercommand). When I type commands, the client sends them to the daemon to execute. -
Docker Hub: A public registry where people share Docker images. I pulled several images from here during the lab, including
hello-world,busybox, andprakhar1989/static-site.
7. Deploying a Web Application from Docker Hub
To see Docker in action with something more realistic, I decided to deploy an actual web application. I used a pre-built image called prakhar1989/static-site that contains a simple static website.
7.1 First Run (No Port Mapping)
My first attempt was:
docker run --rm prakhar1989/static-siteThe --rm flag tells Docker to automatically delete the container when it stops. Docker pulled the image and started a web server inside the container, but there was a problem—I couldn't actually access the website in my browser. That's because I didn't map any ports from the container to my host machine. The server was running inside the container, but it was completely isolated.
I pressed Ctrl + C to stop it and tried a different approach.
7.2 Detached Mode with Random Port Mapping
This time, I ran the container in the background and let Docker automatically map the ports:
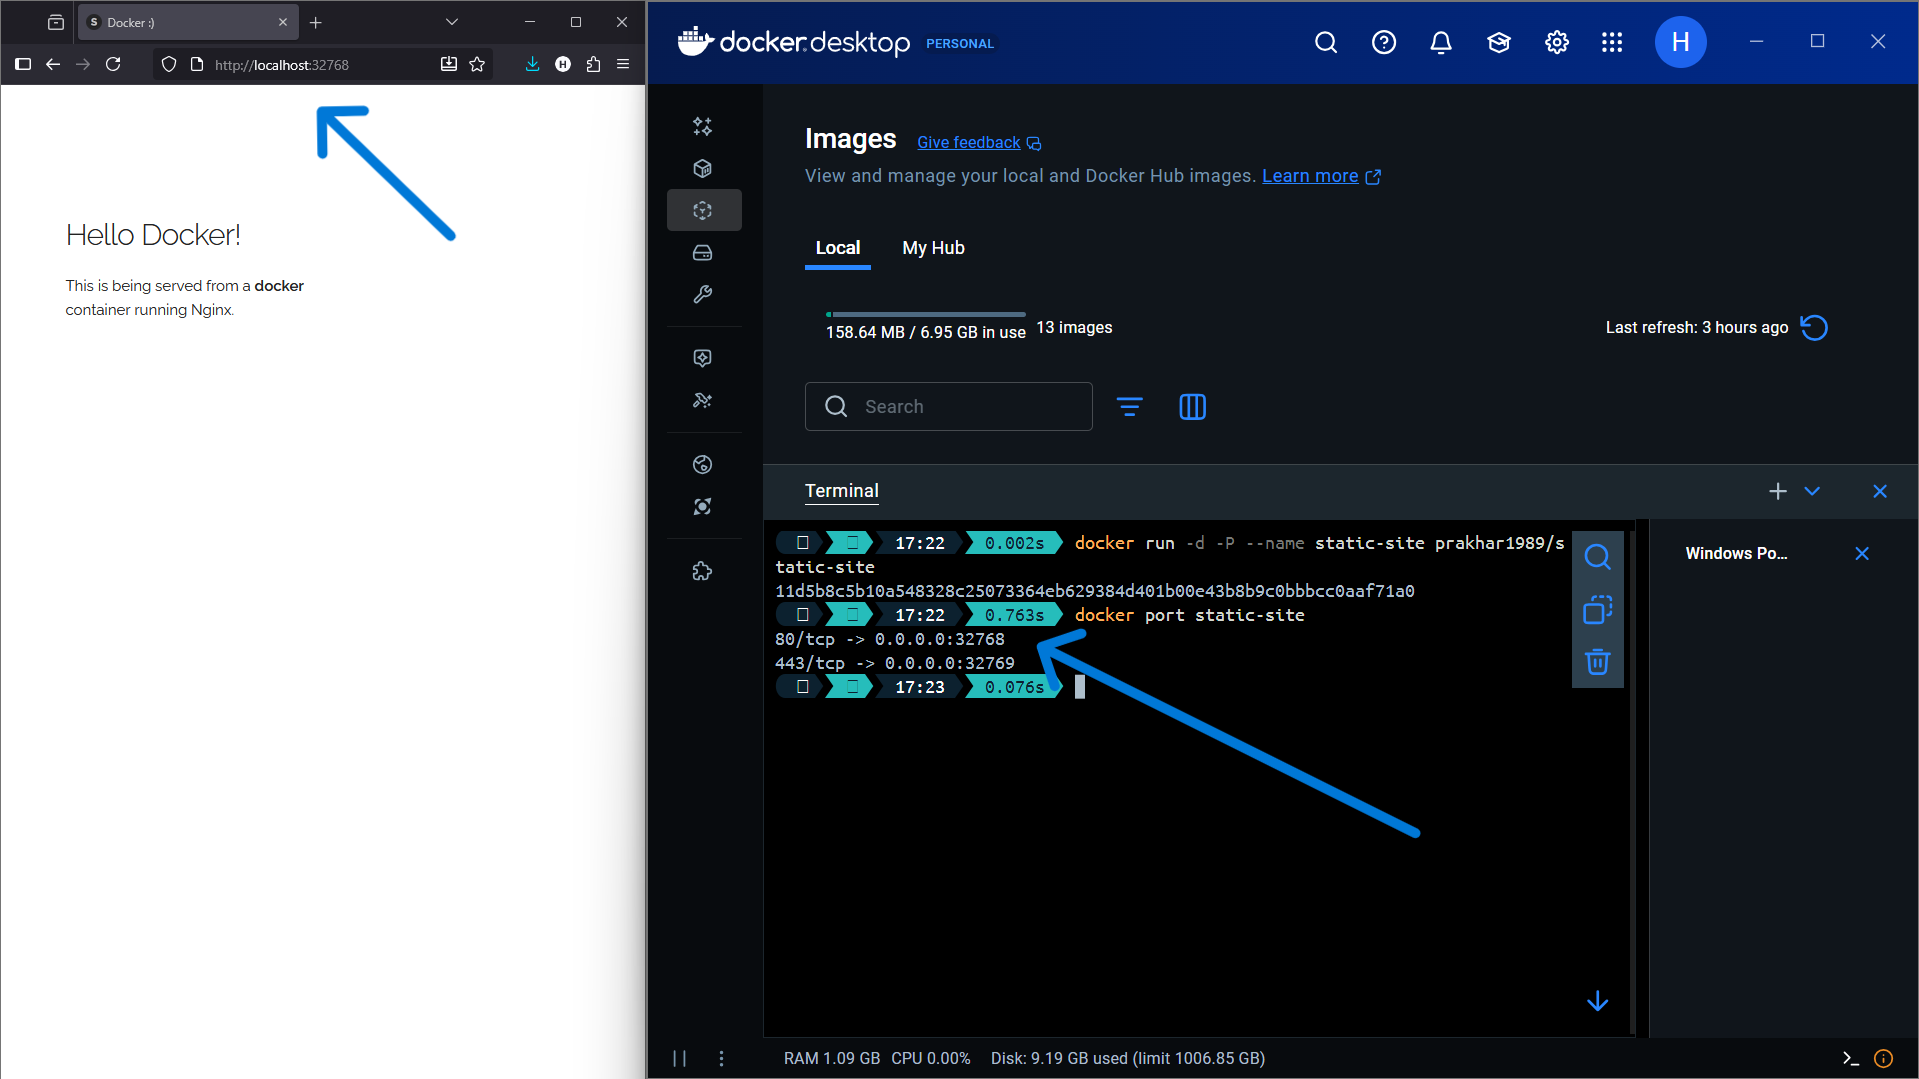
docker run -d -P --name static-site prakhar1989/static-siteHere's what each flag does:
-d: runs the container in detached mode (in the background), so I get my terminal back.-P: tells Docker to publish all exposed ports to random available ports on my machine.--name static-site: gives the container a memorable name instead of a random one.
To find out which port Docker assigned, I ran:
docker port static-siteIt showed me something like:
80/tcp -> 0.0.0.0:32769This meant I could access the website at http://localhost:32769 in my browser. Success!
7.3 Custom Port Mapping
Random ports work fine, but sometimes you want to use a specific port. I can do that with the -p flag:
docker run -d -p 8888:80 prakhar1989/static-siteThe -p 8888:80 flag maps port 8888 on my machine to port 80 inside the container. Now I could visit http://localhost:8888 and see the website.
When I was done, stopping the container was simple:
docker stop static-siteI could also use the container ID instead of the name. This whole exercise showed me how incredibly easy it is to spin up a web server in Docker and make it accessible from my host machine.
8. Creating My Own Application Image
So far I'd been using pre-made images, but the real power of Docker comes from building your own. The lab walked me through creating a custom image from scratch, starting with a base Ubuntu 14.04 system and installing Apache and PHP to run a simple web app.
8.1 Running an Ubuntu Base Container
First, I started an Ubuntu container and opened an interactive shell:
docker run -t -i ubuntu:14.04The -t flag gives me a terminal, and -i keeps the input stream open so I can type commands. This dropped me into a shell inside a fresh Ubuntu 14.04 container, ready for me to set things up.
8.2 Installing Apache and PHP
Inside the container, we ran:
apt-get update
apt-get install apache2 php5 nano curl
We then created a simple PHP file as our web application:
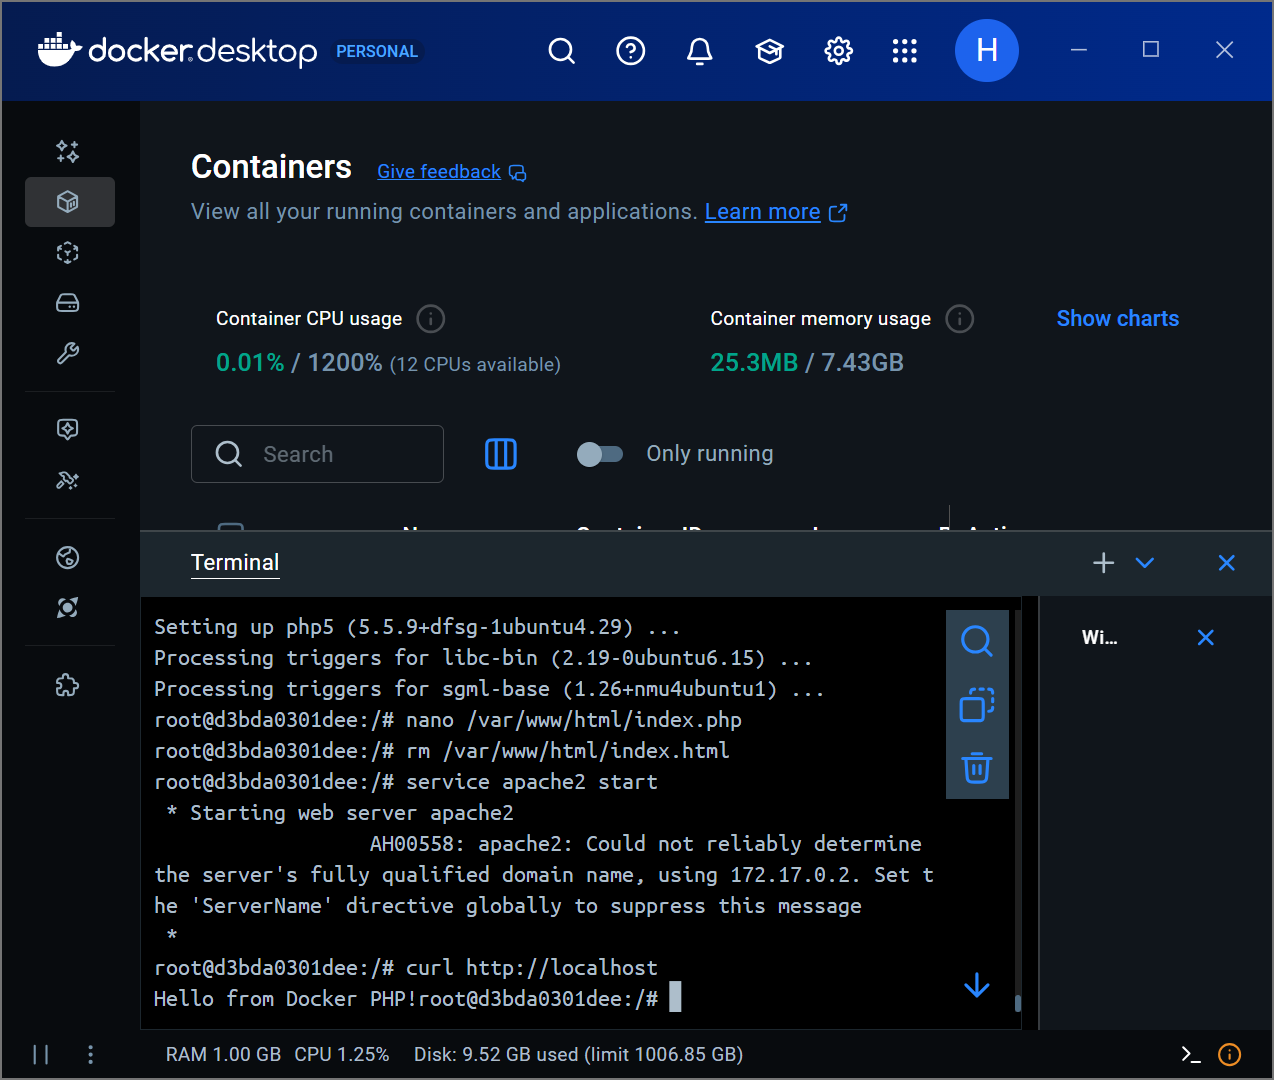
nano /var/www/html/index.phpExample content:
<?php
echo "Hello from Docker PHP!";
?>
We removed the default index.html so our PHP file becomes the main page:
rm /var/www/html/index.htmlThen we started the Apache service:
service apache2 startTo verify the application inside the container:
curl http://localhostWe received the “Hello from Docker PHP!” response, which confirmed the app was running.
8.3 Saving the Container as an Image
Once my container was configured, I returned to the host:
exitThen I located the container I just exited:
docker ps -aI committed this container as a new image called myapp:
docker commit <CONTAINER_ID> myapp
docker images
Now myapp appeared in the list of local images.
8.4 Running the Custom Image
I could now launch fresh containers from this myapp image:
docker run -t -i myappInside the container:
service apache2 start
curl http://localhost
Optionally, to make it accessible from the host browser:
docker run -d -p 8080:80 myappThen I opened:
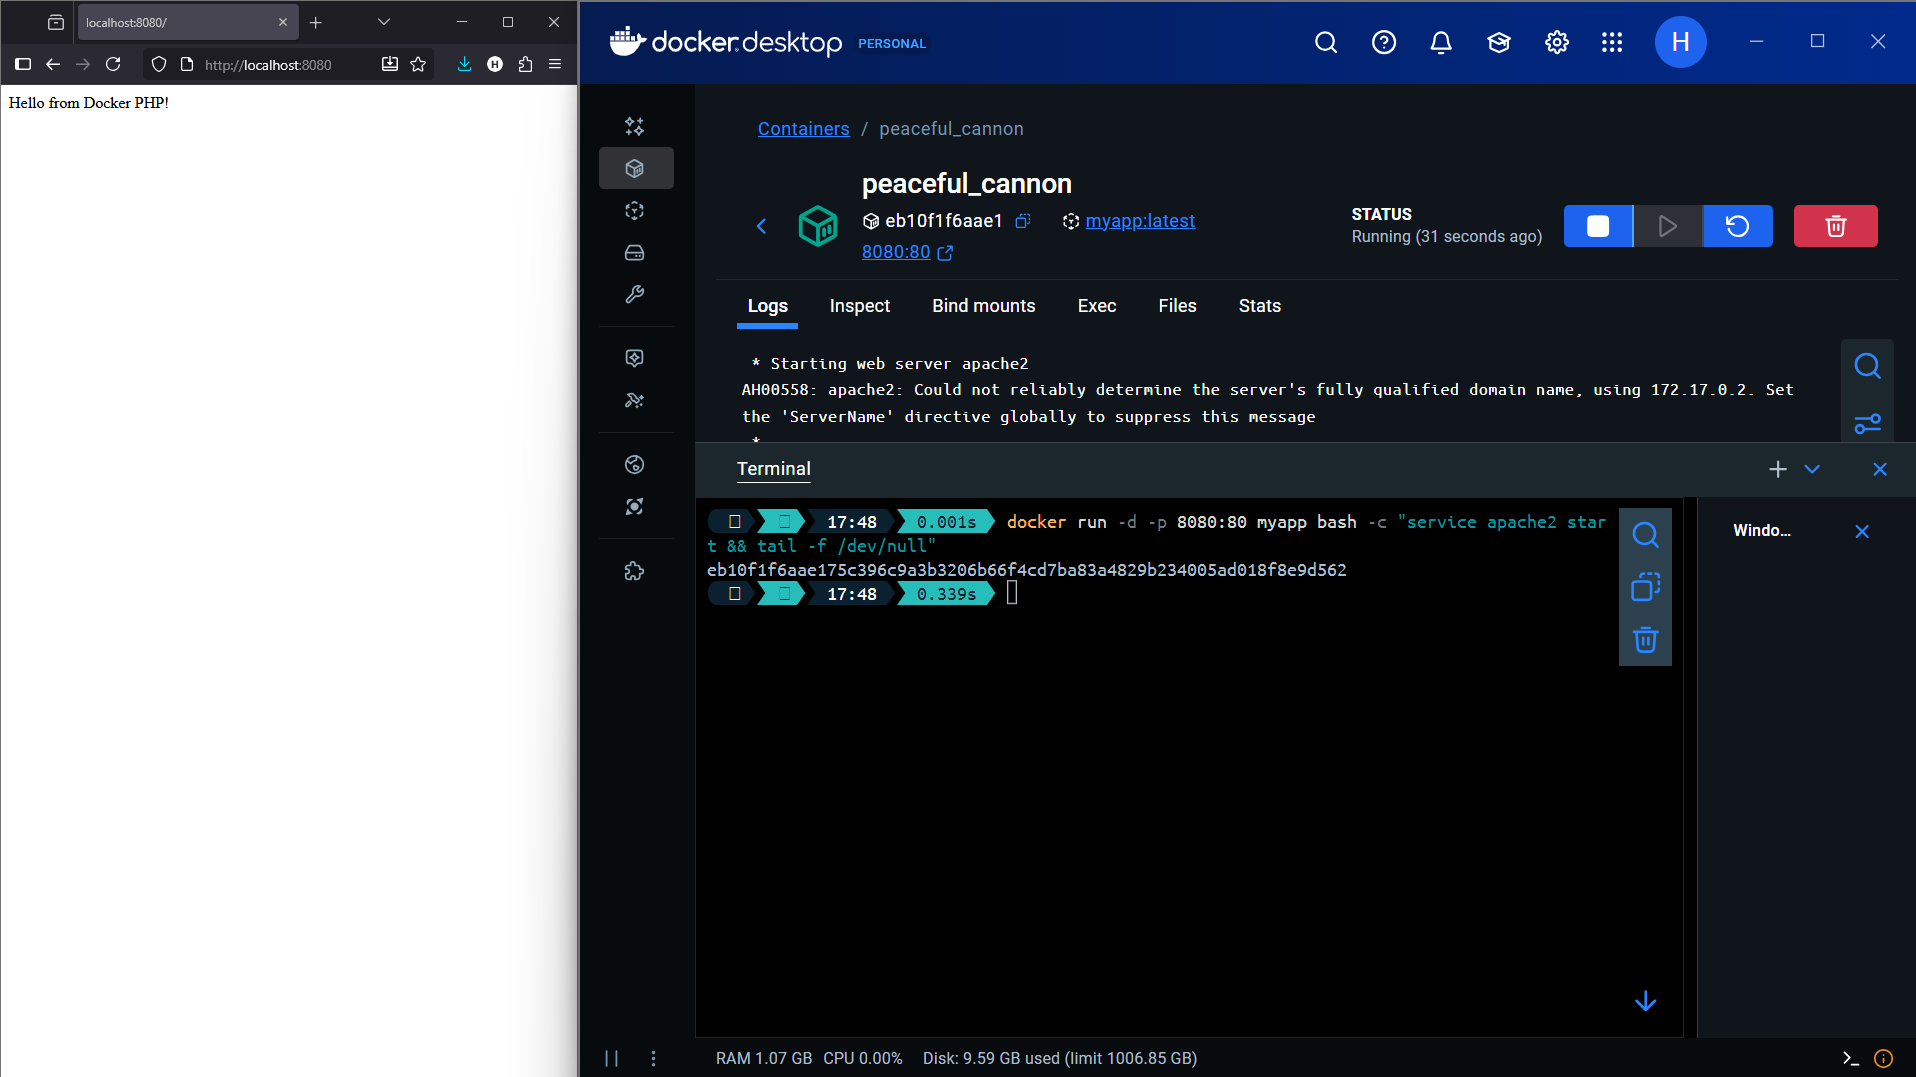
http://localhost:8080But this would not work. When I tried to run my custom myapp image with docker run -d -p 8080:80 myapp, the container exited right away. I realized that the image was still using the default command from ubuntu:14.04 (a non-interactive shell), and no foreground process was keeping the container alive. This helped me understand that a container only stays running as long as its main process is active.
But by running docker run -d -p 8080:80 myapp bash -c "service apache2 start && tail -f /dev/null", I could keep the container alive and access the PHP page at http://localhost:8080.
9. Small Python Web Application in a Container
To align with the professor's suggestion of having a Java or Python application, I also containerized a very small Python web app using Flask.
9.1 Example app.py
from flask import Flask

app = Flask(__name__)

@app.get("/")
def home():
    return "Hello from Dockerized Python Flask app!"

if __name__ == "__main__":
    app.run(host="0.0.0.0", port=5000)
9.2 Example Dockerfile
# 1. Base image: official lightweight Python image
FROM python:3.11-slim

# 2. Set working directory inside the container
WORKDIR /app

# 3. Copy requirement file and install dependencies
COPY requirements.txt /app/
RUN pip install --no-cache-dir -r requirements.txt

# 4. Copy the rest of the app
COPY app.py /app/

# 5. Expose the port the Flask app will listen on
EXPOSE 5000

# 6. Command to run the app
CMD ["python", "app.py"]
9.3 Build and Run
docker build -t python-flask-app .
docker run -d -p 5001:5000 python-flask-app
Then open:
http://localhost:5001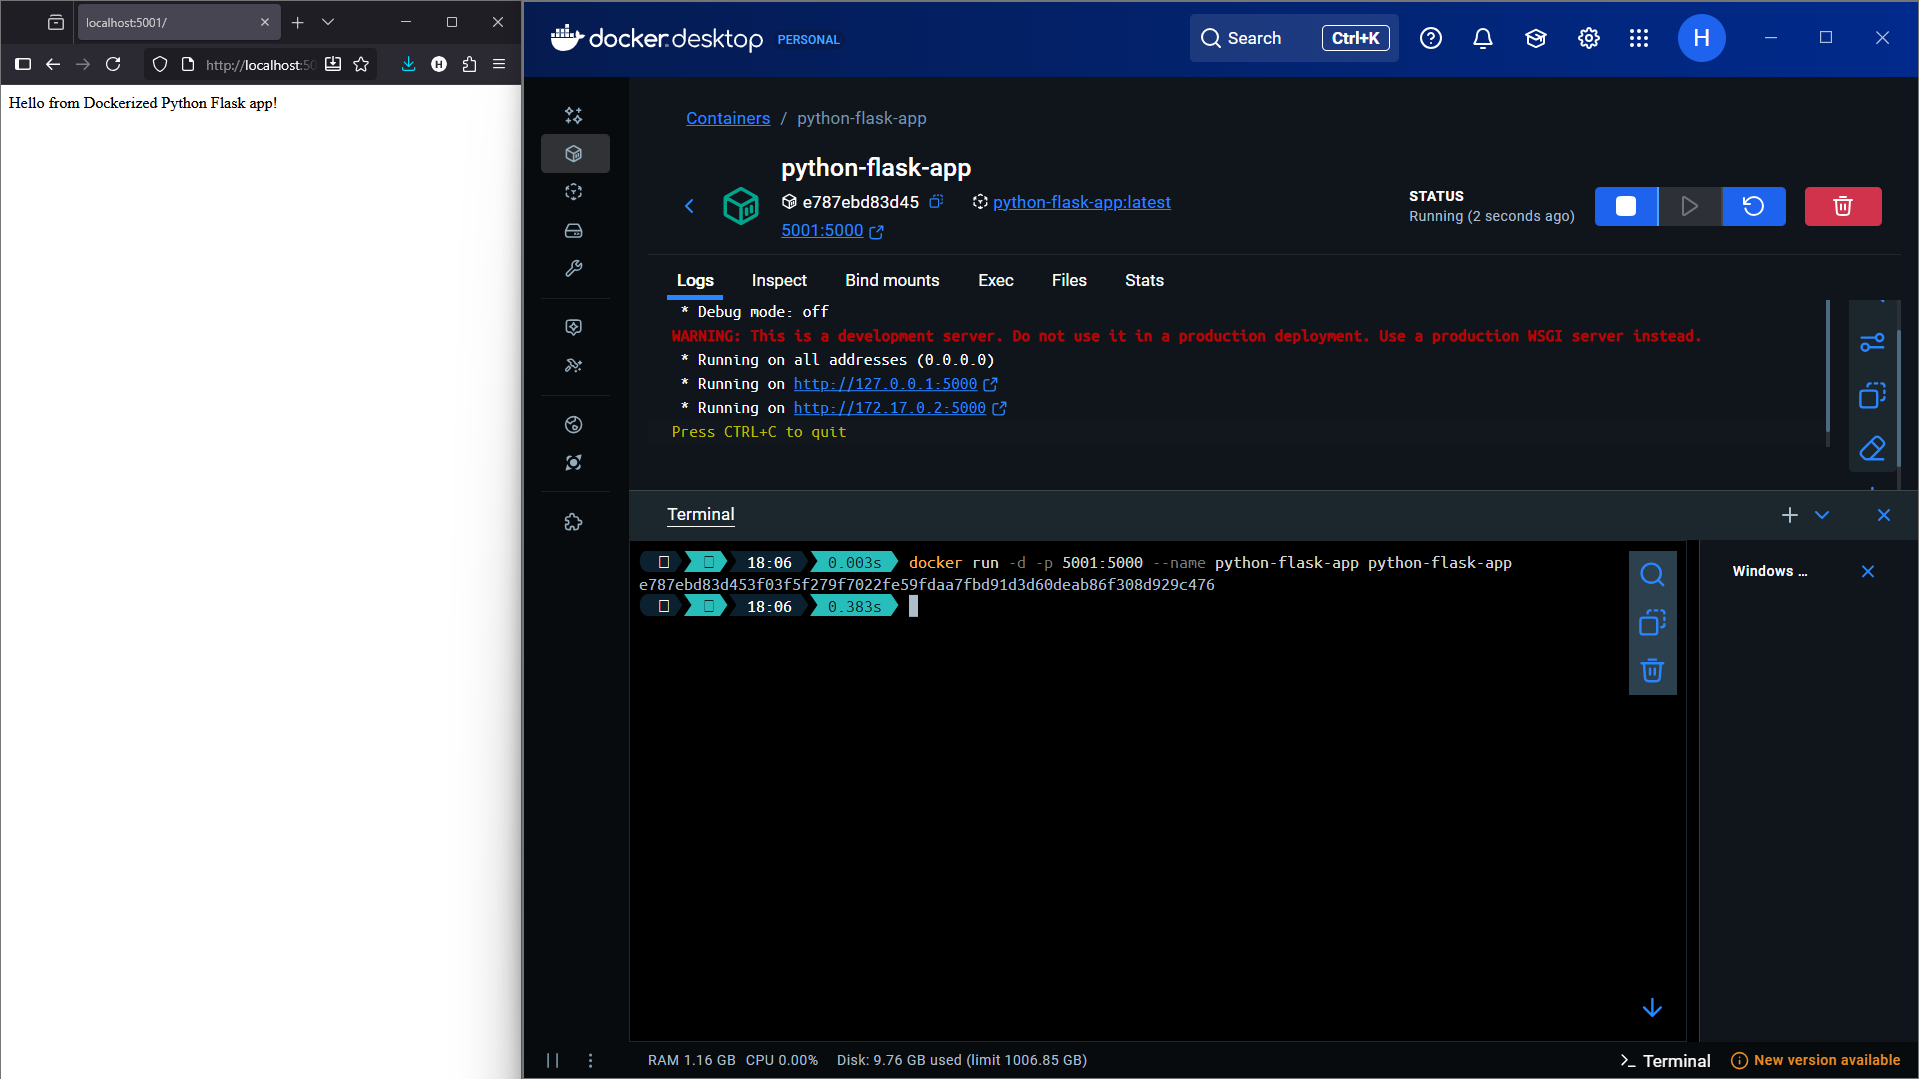
10. Question: What do you think about the ability to work with a docker environment to create an application?
Docker provides a powerful and efficient way to create, deploy, and manage applications in isolated environments. The ability to package an application along with its dependencies into a single container ensures consistency across different environments, making it easier to develop, test, and deploy applications. Docker's lightweight nature allows for rapid scaling and resource optimization, which is particularly beneficial in cloud computing scenarios. Overall, working with Docker enhances productivity and simplifies the application lifecycle management process.