



AWS_LAB
md26 kBIn Lab 2: AWS RDS and EC2
Labwork: Using AWS RDS (MySQL) and EC2 (Linux)
After this labwork you will be able to:
- Understand AWS cloud computing services and Infrastructure as a Service (IaaS).
- Use the AWS Management Console.
- Create and use a Linux virtual machine using Amazon EC2.
- Create and manage a MySQL database using Amazon RDS.
- Deploy containerized applications using Docker on EC2.
This lab is divided into three main parts:
- Part I - Linux Virtual Machine on Amazon EC2
- Part II - MySQL Database on AWS RDS
- Part III - Running Docker Containers on EC2 (advanced)
For each part you will follow instructions and answer some questions.
Introduction to AWS and Cloud Computing
What is Amazon Web Services (AWS)?
Amazon Web Services (AWS) is a comprehensive cloud computing platform provided by Amazon. It offers a wide range of cloud services including computing power, storage, databases, networking, analytics, machine learning, and more.
Key characteristics of AWS:
- On-demand: Resources are available when you need them
- Pay-as-you-go: You only pay for what you use
- Scalable: Easy to scale resources up or down
- Global: Data centers in multiple regions worldwide
- Secure: Enterprise-grade security and compliance
Cloud Service Models
AWS provides different service models:
-
Infrastructure as a Service (IaaS) - Focus of this lab
- Provides virtualized computing resources
- You manage: OS, applications, data
- AWS manages: Physical infrastructure, virtualization
- Examples: EC2, VPC, EBS
-
Platform as a Service (PaaS)
- Provides a platform for application development
- You manage: Applications and data
- AWS manages: Runtime, middleware, OS, infrastructure
- Examples: Elastic Beanstalk, Lambda
-
Software as a Service (SaaS)
- Complete applications managed by the provider
- Examples: Amazon WorkDocs, Amazon Chime
AWS Regions and Availability Zones
- Region: A geographical area containing multiple data centers (e.g.,
eu-central-1- Frankfurt,us-east-1- N. Virginia) - Availability Zone (AZ): One or more discrete data centers within a Region
- Each Region has multiple AZs for high availability and fault tolerance
Reference: AWS Global Infrastructure
Part I - Linux Virtual Machine on Amazon EC2
Overview of AWS Compute Services
AWS provides several computing services to run applications in the cloud:
| Service | Type | Description | Use Case |
|---|---|---|---|
| Amazon EC2 | IaaS | Virtual servers in the cloud | Full control over OS and applications |
| AWS Lambda | Serverless | Run code without managing servers | Event-driven applications |
| AWS Elastic Beanstalk | PaaS | Deploy and scale web applications | Quick deployment without infrastructure management |
| Amazon ECS/EKS | Container | Run Docker containers | Microservices architecture |
| Amazon Lightsail | Simplified VPS | Easy-to-use virtual private servers | Simple web applications |
What is Amazon EC2?
Amazon Elastic Compute Cloud (EC2) is a web service that provides secure, resizable compute capacity in the cloud. It is the core IaaS offering from AWS.
Key Features of EC2:
-
Virtual Computing Environments (Instances)
- Choose from various instance types optimized for different workloads
- Instance families: General Purpose (T3, M5), Compute Optimized (C5), Memory Optimized (R5), Storage Optimized (I3), GPU Instances (P3, G4)
-
Flexible Configuration
- Choose CPU, memory, storage, and networking capacity
- Select from multiple operating systems (Linux, Windows, etc.)
- Configure security with Security Groups (virtual firewalls)
-
Storage Options
- Instance Store: Temporary block-level storage
- Elastic Block Store (EBS): Persistent block storage volumes
- Elastic File System (EFS): Scalable file storage
-
Networking Features
- Virtual Private Cloud (VPC): Isolated network environment
- Elastic IP: Static public IP addresses
- Elastic Network Interfaces: Virtual network cards
- Security Groups: Control inbound and outbound traffic
-
Scalability and High Availability
- Auto Scaling: Automatically adjust capacity
- Elastic Load Balancing: Distribute traffic across instances
- Multiple Availability Zones: Deploy across multiple data centers
-
Purchasing Options
- On-Demand: Pay by the hour or second
- Reserved Instances: Commit for 1-3 years for discounts
- Spot Instances: Bid for unused capacity at lower prices
- Savings Plans: Flexible pricing model
-
Amazon Machine Images (AMI)
- Pre-configured templates containing OS and software
- AWS provides official AMIs (Amazon Linux, Ubuntu, Windows, etc.)
- You can create custom AMIs
- Community and Marketplace AMIs available
-
Instance Lifecycle
- Launch: Start a new instance
- Stop: Shut down (you're charged for EBS storage only)
- Start: Resume a stopped instance
- Reboot: Restart the instance
- Terminate: Permanently delete the instance
Reference: Amazon EC2 Documentation
1. Open the AWS Management Console and EC2
- Go to the AWS Management Console: https://console.aws.amazon.com
- Sign in with your AWS account.
- At the top-right, make sure you select a region close to you (for example:
eu-central-1oreu-west-1).
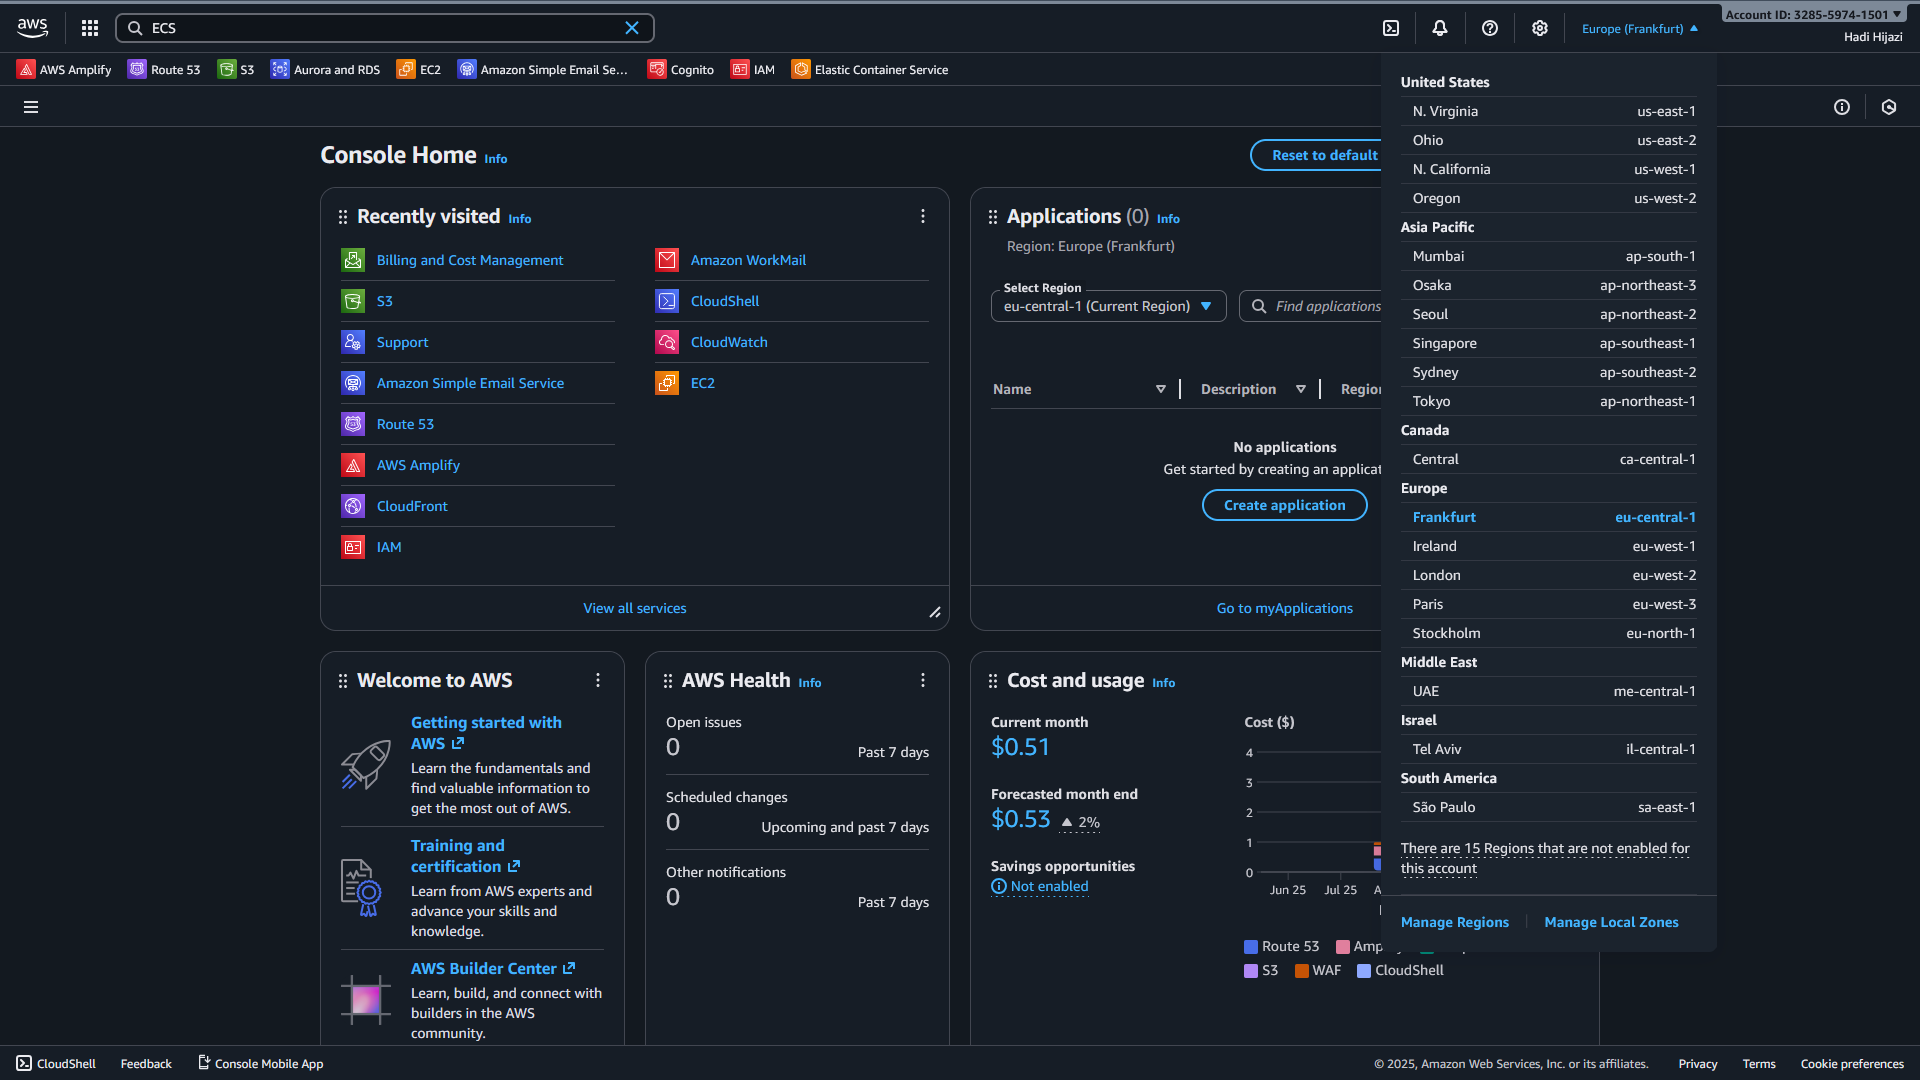
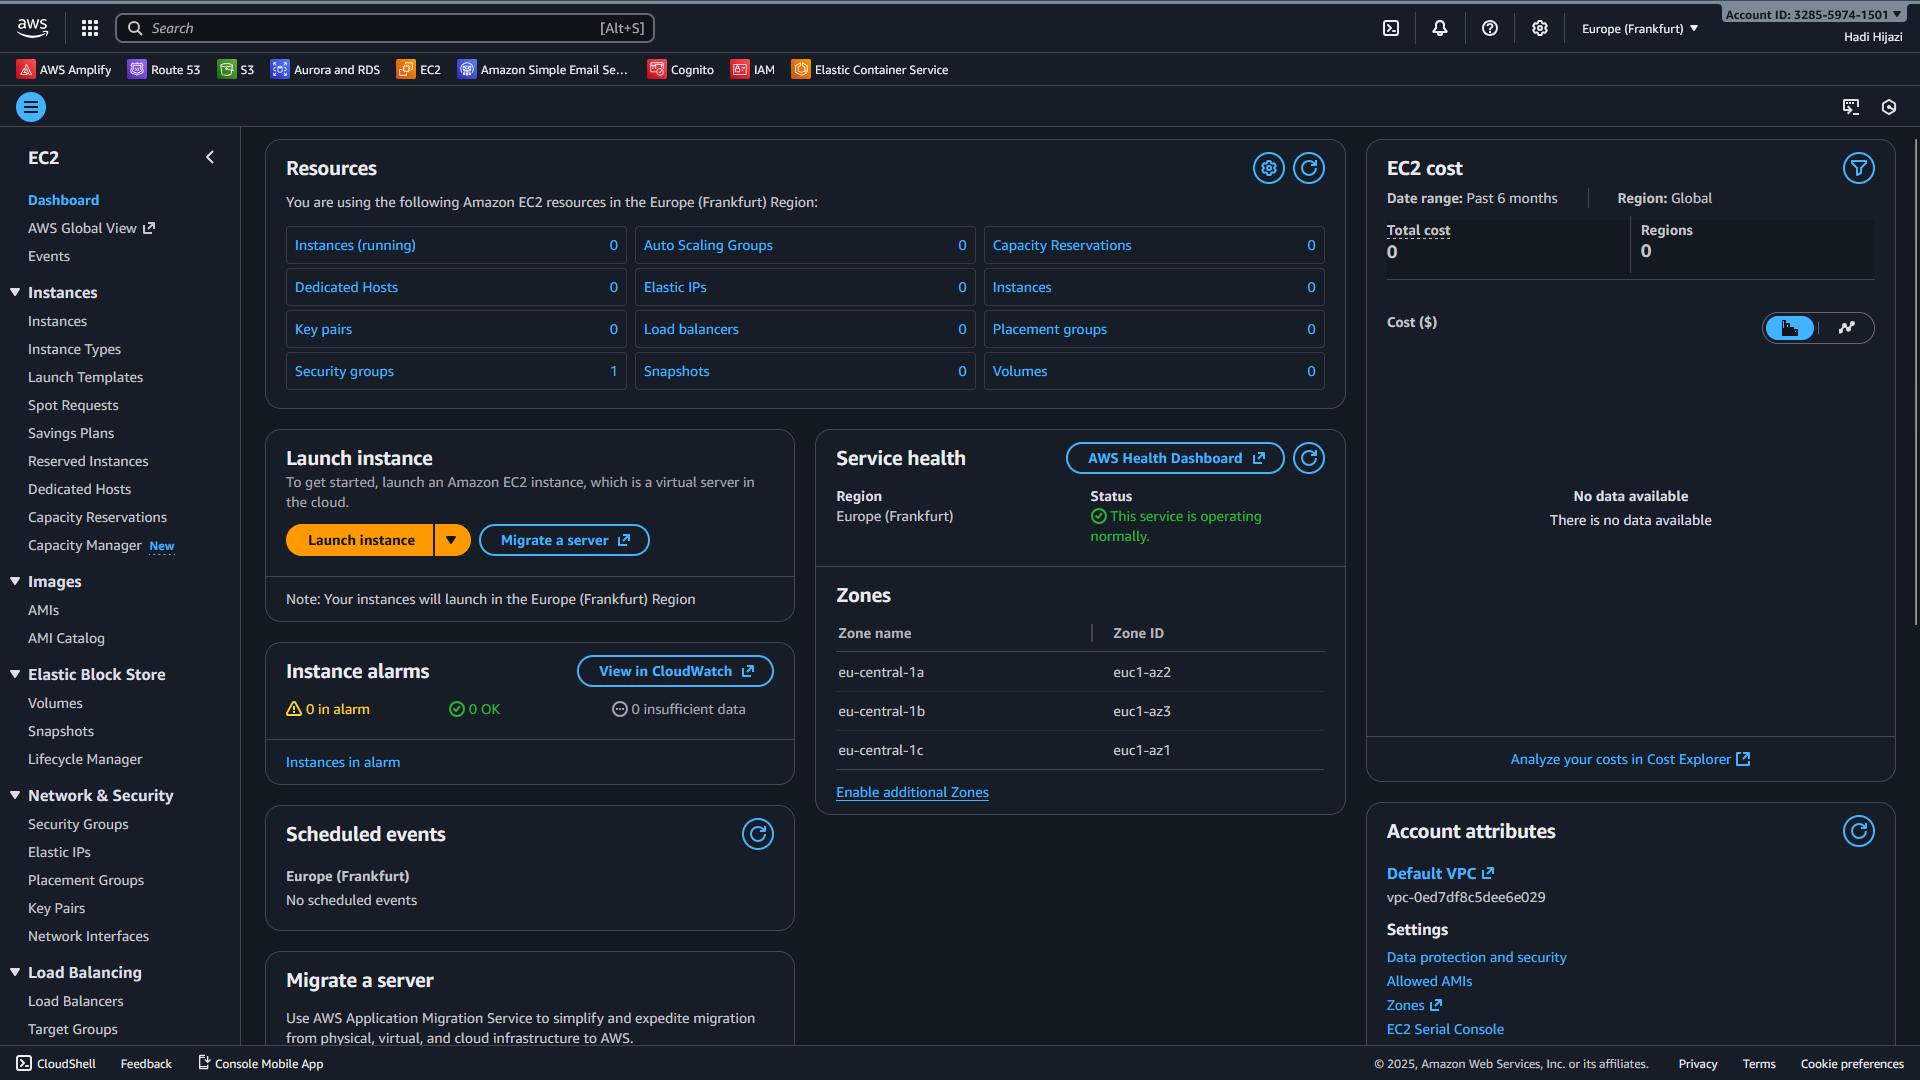
- In the search bar, type EC2 and open the EC2 service.
2. Launch an EC2 Instance
-
In the EC2 dashboard, click Instances → Launch instances.
-
Fill in the launch form:
-
Name and tags: give your instance a name like
yourname-lab-vm. -
Application and OS Images (AMI):
- Choose a Linux image such as Amazon Linux 2023 or Ubuntu Server (free-tier eligible).
- AMIs are pre-configured templates that contain the operating system and optionally other software.
-
Instance type:
- Choose a small, free-tier eligible instance, for example
t2.microort3.micro. - Instance types determine the CPU, memory, storage, and networking capacity.
- t2.micro: 1 vCPU, 1 GB RAM (free-tier eligible)
- Different instance families serve different purposes (compute, memory, storage optimized).
- Choose a small, free-tier eligible instance, for example
-
Key pair (login):
- Create a new key pair if you don't have one.
- Download the
.pem(or.ppk) file and keep it safe. You will use it for SSH. - Key pairs provide secure SSH access to your instance.
-
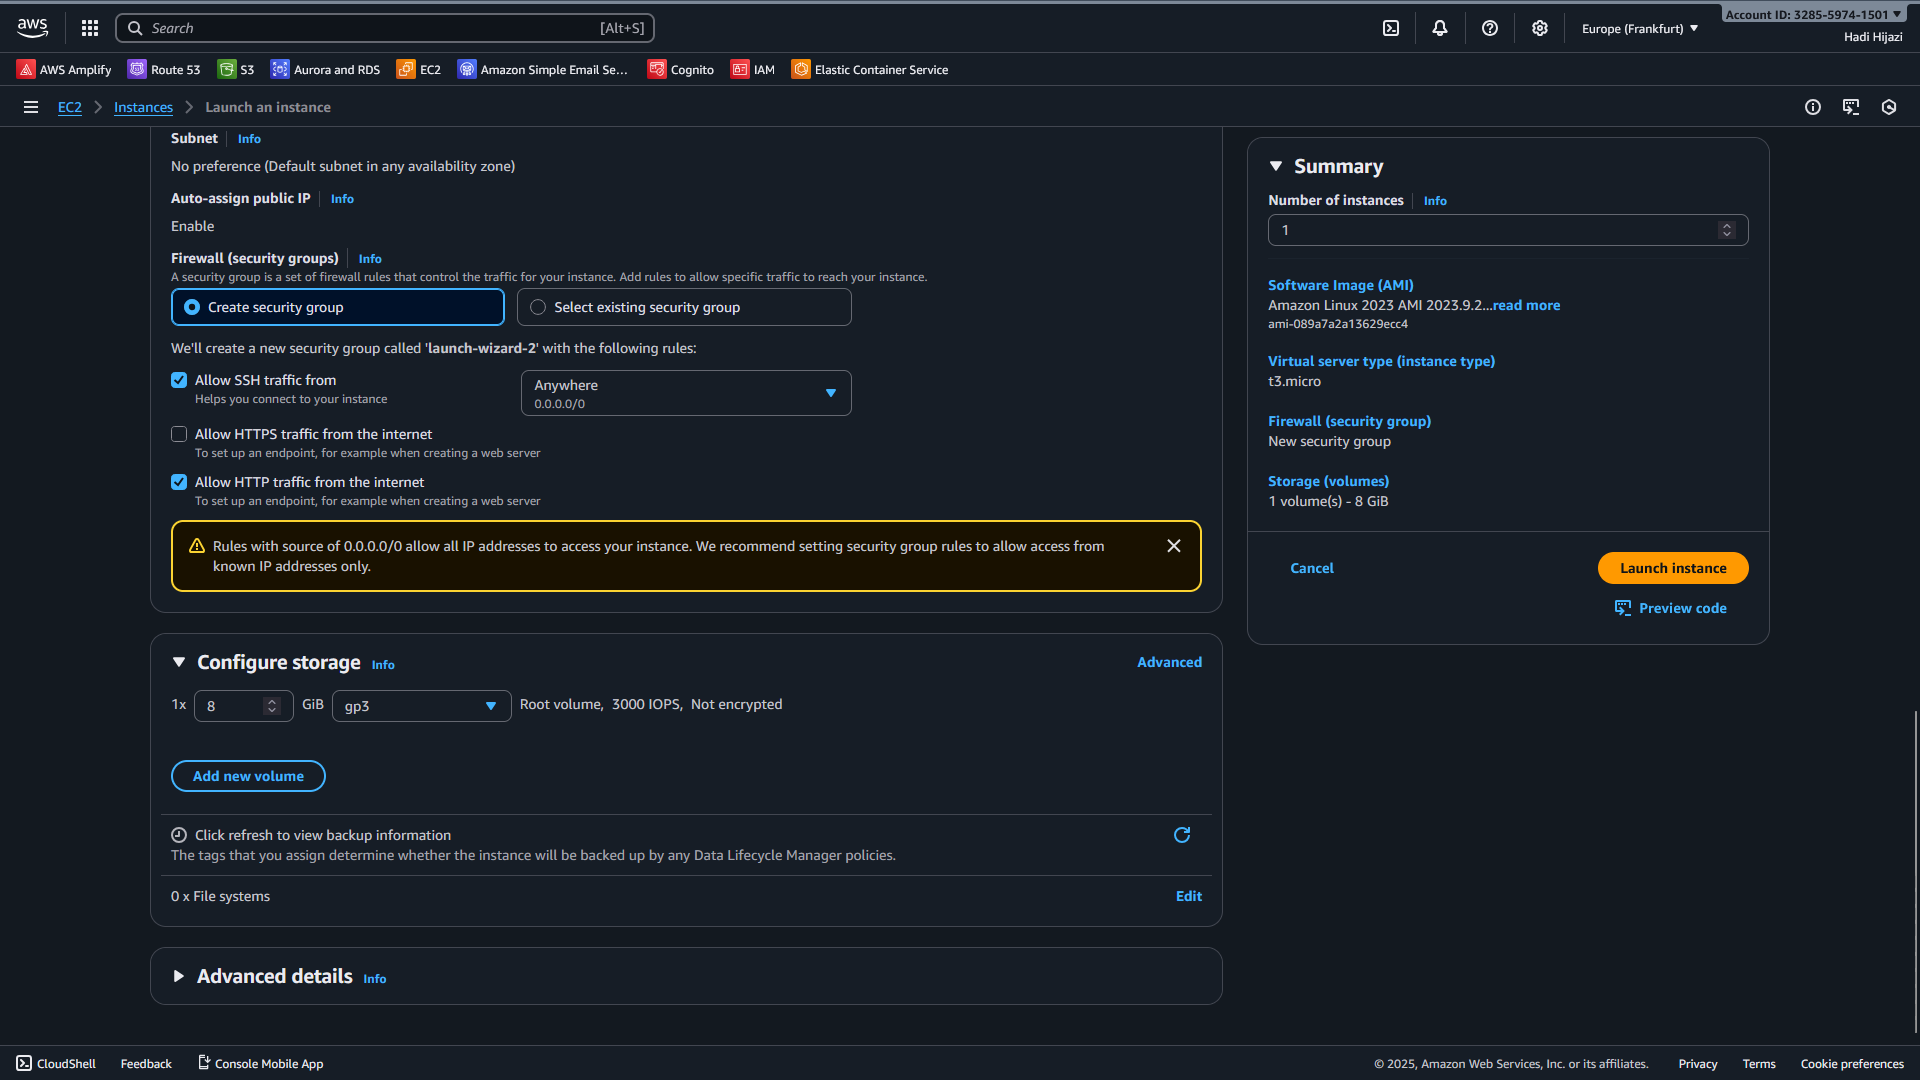
Network settings (firewall):
- Use the default VPC and subnet.
- Create or select a security group that allows SSH (port 22) from your IP.
- Security groups act as virtual firewalls controlling inbound and outbound traffic.
- Best practice: Restrict SSH access to your IP address only.
-
Configure storage:
- Keep the default root volume size (e.g. 8-20 GB) unless instructed otherwise.
- Choose General Purpose SSD (gp3) for the volume type.
- You can add additional EBS volumes if needed.
-
-
Review the summary and click Launch instance.
-
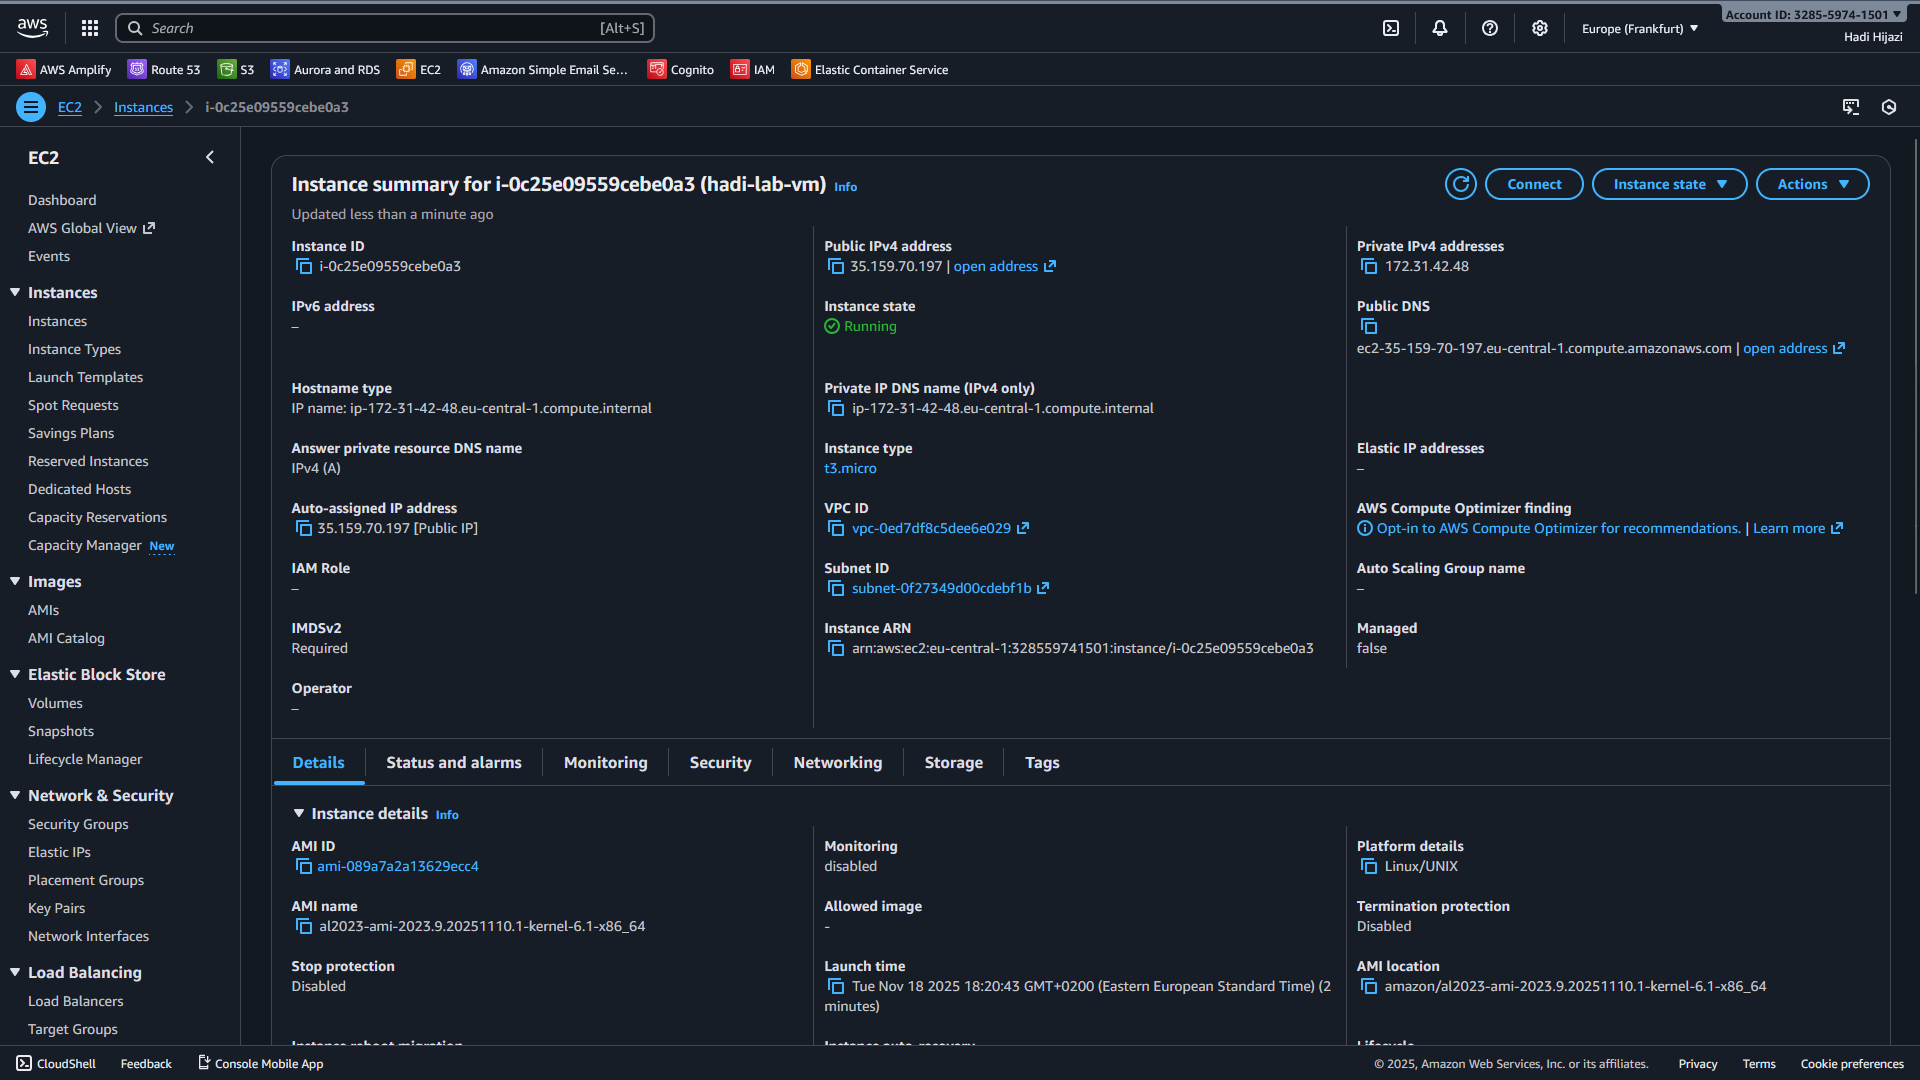
Go back to Instances and wait until the instance state becomes Running and the status checks show as 2/2 checks passed.
3. Explore the EC2 Instance Details
Select your running instance and look at the details panel below.
-
Question 1: What is the Instance ID of your VM?
-
Question 2: What is the Public IPv4 address (and/or Public IPv4 DNS) of your instance?
- What is this public address used for?
-
Question 3: What are the available ways to connect to the instance, as shown in the console? (For example: EC2 Instance Connect (browser-based), SSH client, or Session Manager.)
Write your answers in your report.
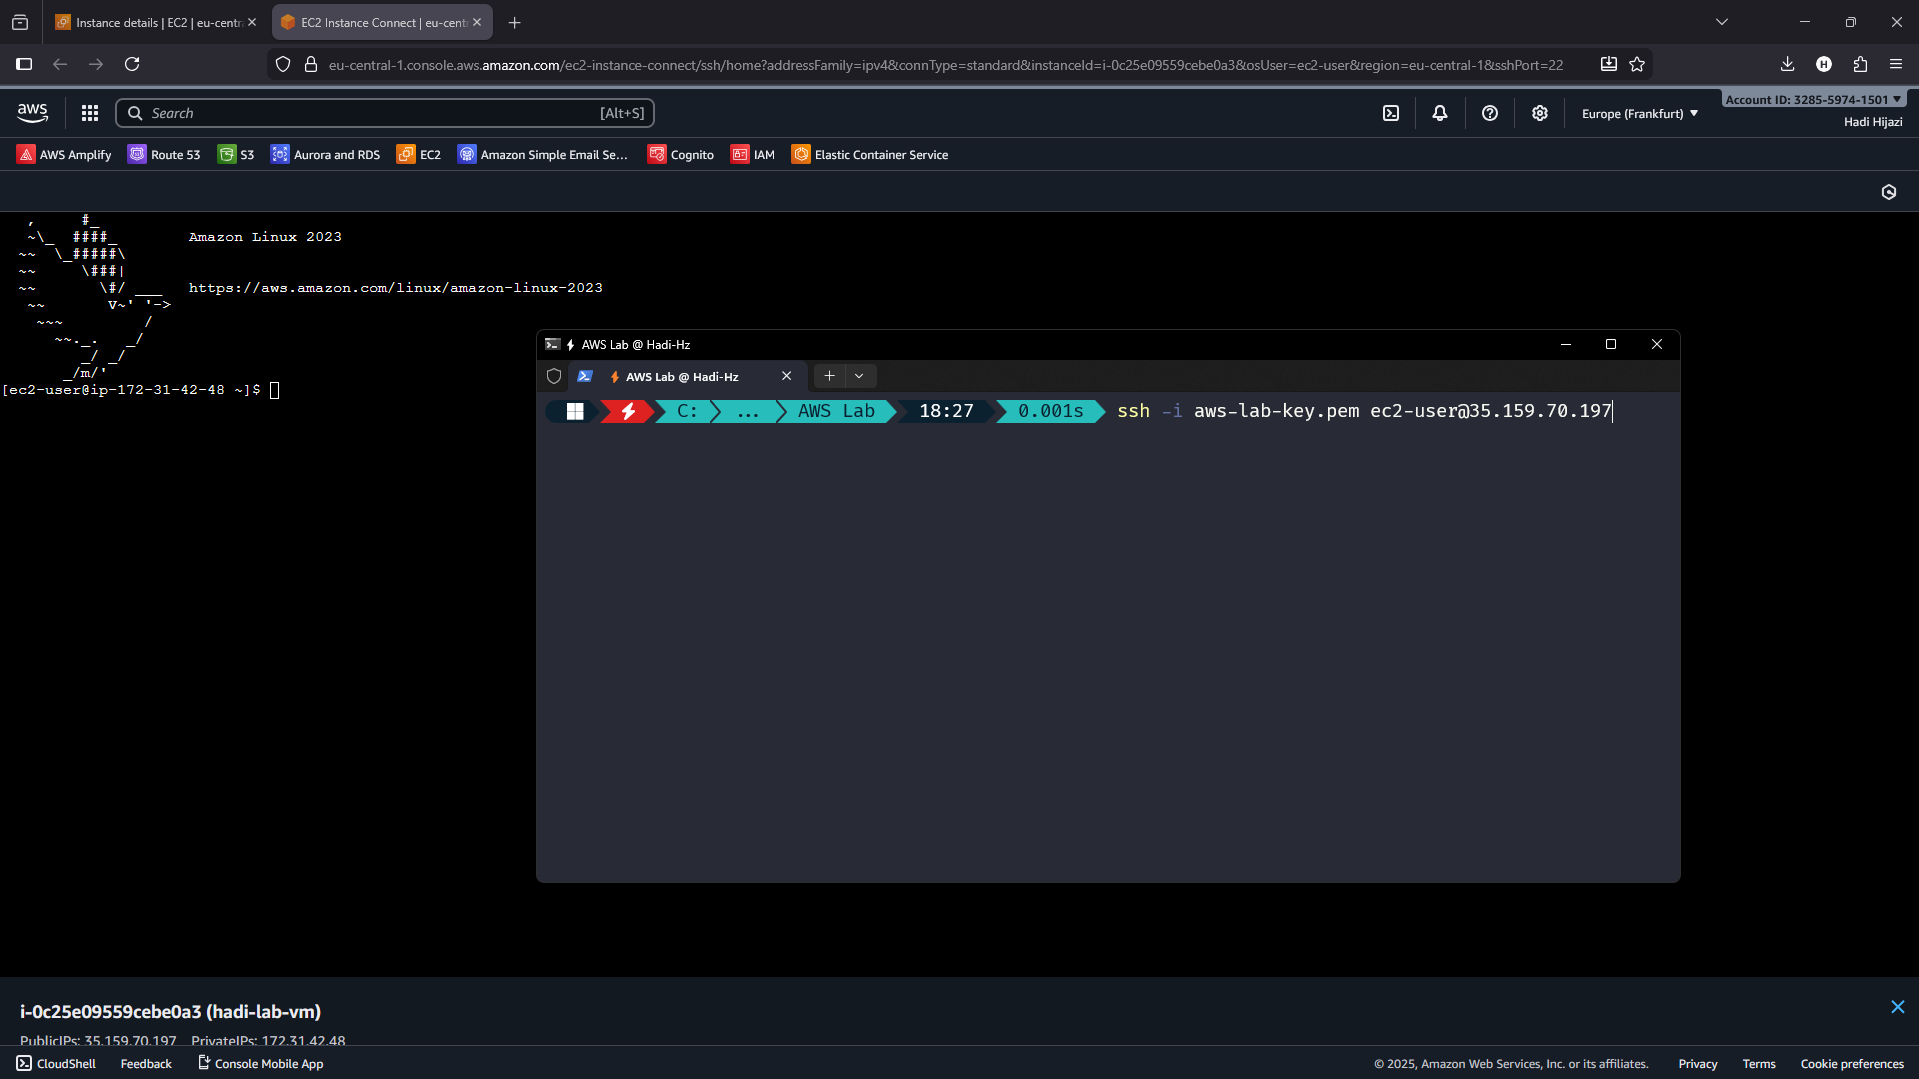
4. Connect to the Instance via SSH
You can connect using either the browser or your local terminal.
Option A - EC2 Instance Connect (Browser)
- Select your instance.
- Click the Connect button.
- Choose the EC2 Instance Connect tab and click Connect.
A browser-based terminal will open.
Option B - SSH Client (Local Terminal)
- Ensure your key pair file (e.g.
my-key.pem) is on your machine and has correct permissions (Linux/macOS):
chmod 400 my-key.pem- Use an SSH command similar to:
ssh -i my-key.pem ec2-user@<your-public-ip>- For Amazon Linux, the default username is often
ec2-user. - For Ubuntu, the default username is usually
ubuntu.
Once connected, you will see a shell prompt on your remote Linux machine.
5. Create Directories on the VM
On your EC2 instance terminal, run the following commands:
- Go to your home directory (if not already there):
cd ~- Create three folders:
Desktop,Documents, andDownloads:
mkdir Desktop
mkdir Documents
mkdir Downloads- List the contents of your home directory:
lsQuestion 4: What do you see in the output of ls?
Describe the folders that exist in your home directory.
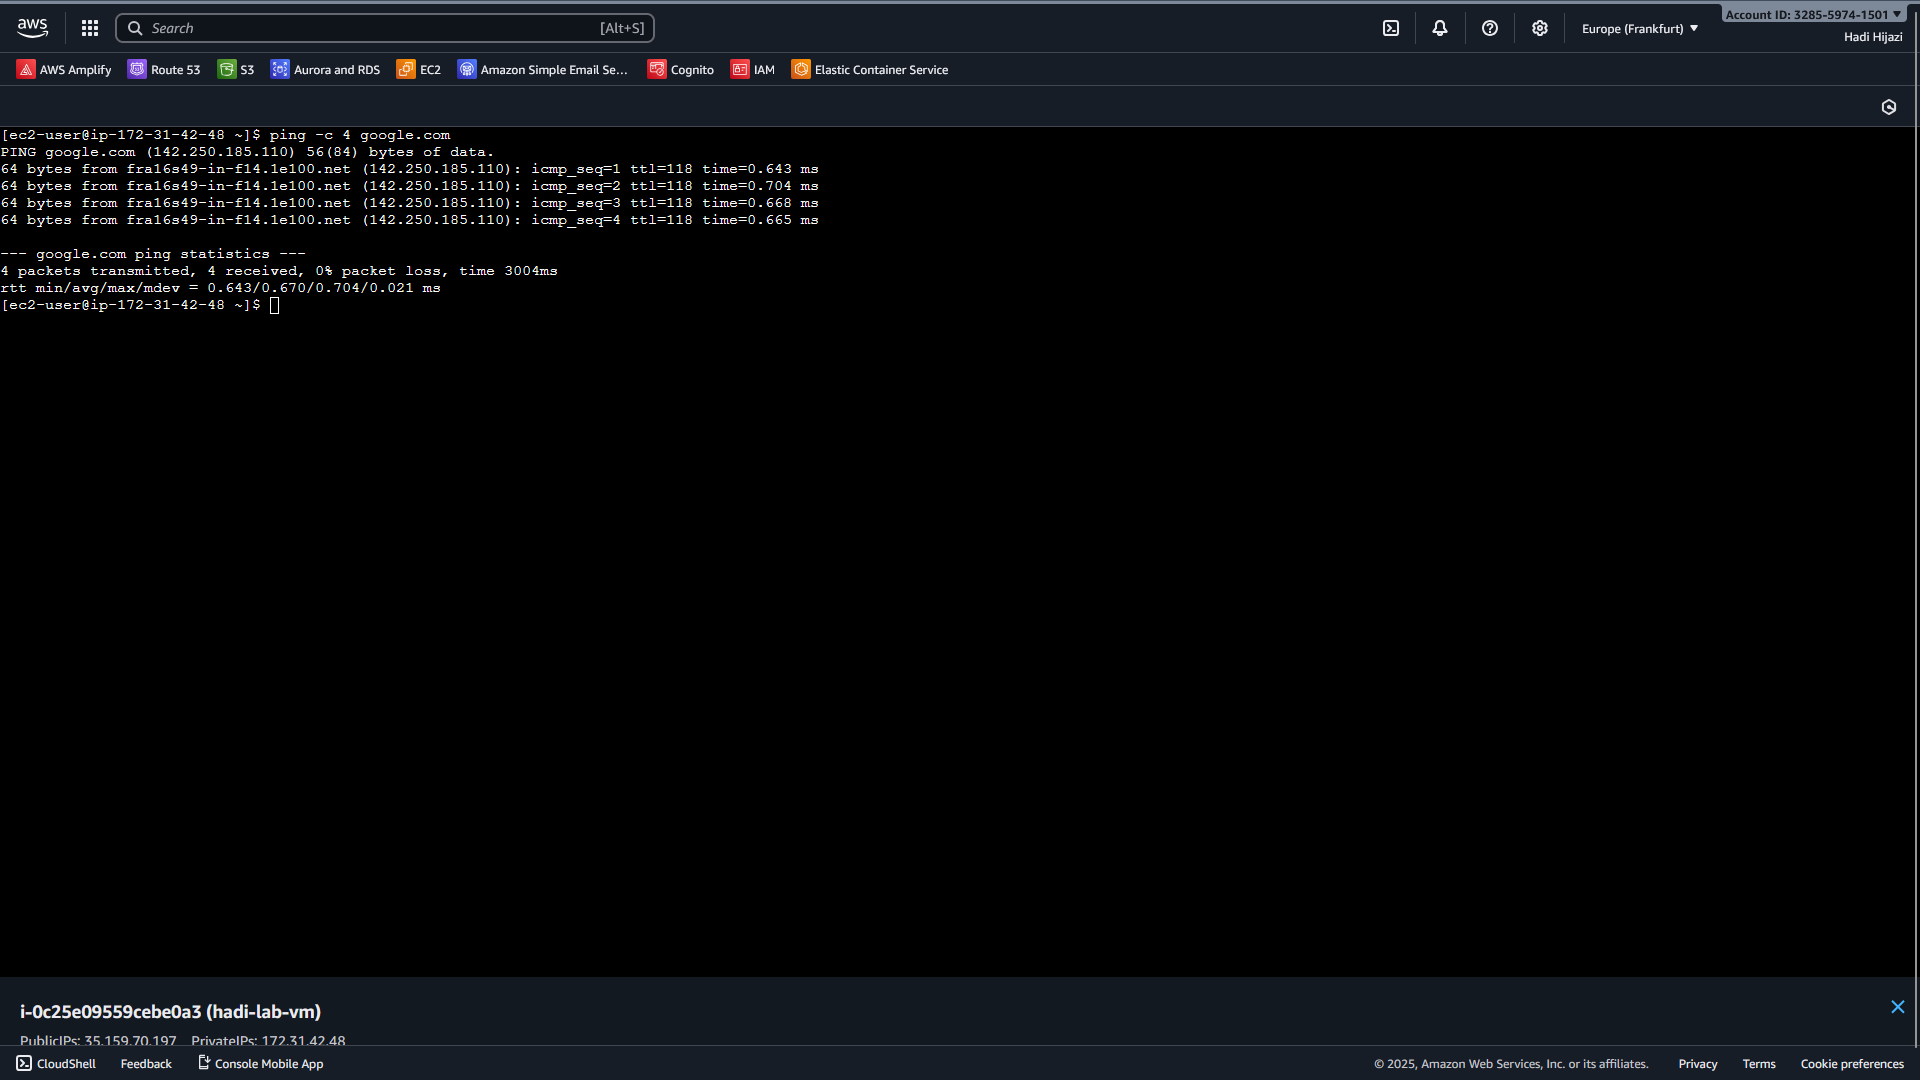
6. Test Network Connectivity (ping)
From your EC2 terminal, try to ping a website, for example:
ping -c 4 google.comQuestion 5: What do you observe in the ping output?
- Are there replies?
- What kind of information is shown in each line (time, TTL, etc.)?
Write a short explanation.
7. Stop or Terminate the Instance
When you finish your work, you should not leave instances running unnecessarily.
-
Go back to the EC2 console.
-
Select your instance.
-
Click Instance state and choose either:
- Stop instance - to shut it down but keep the attached storage (you can start it again later).
- Terminate instance - to permanently delete the instance. If the root volume is set to delete on termination, local data on that volume will be lost.
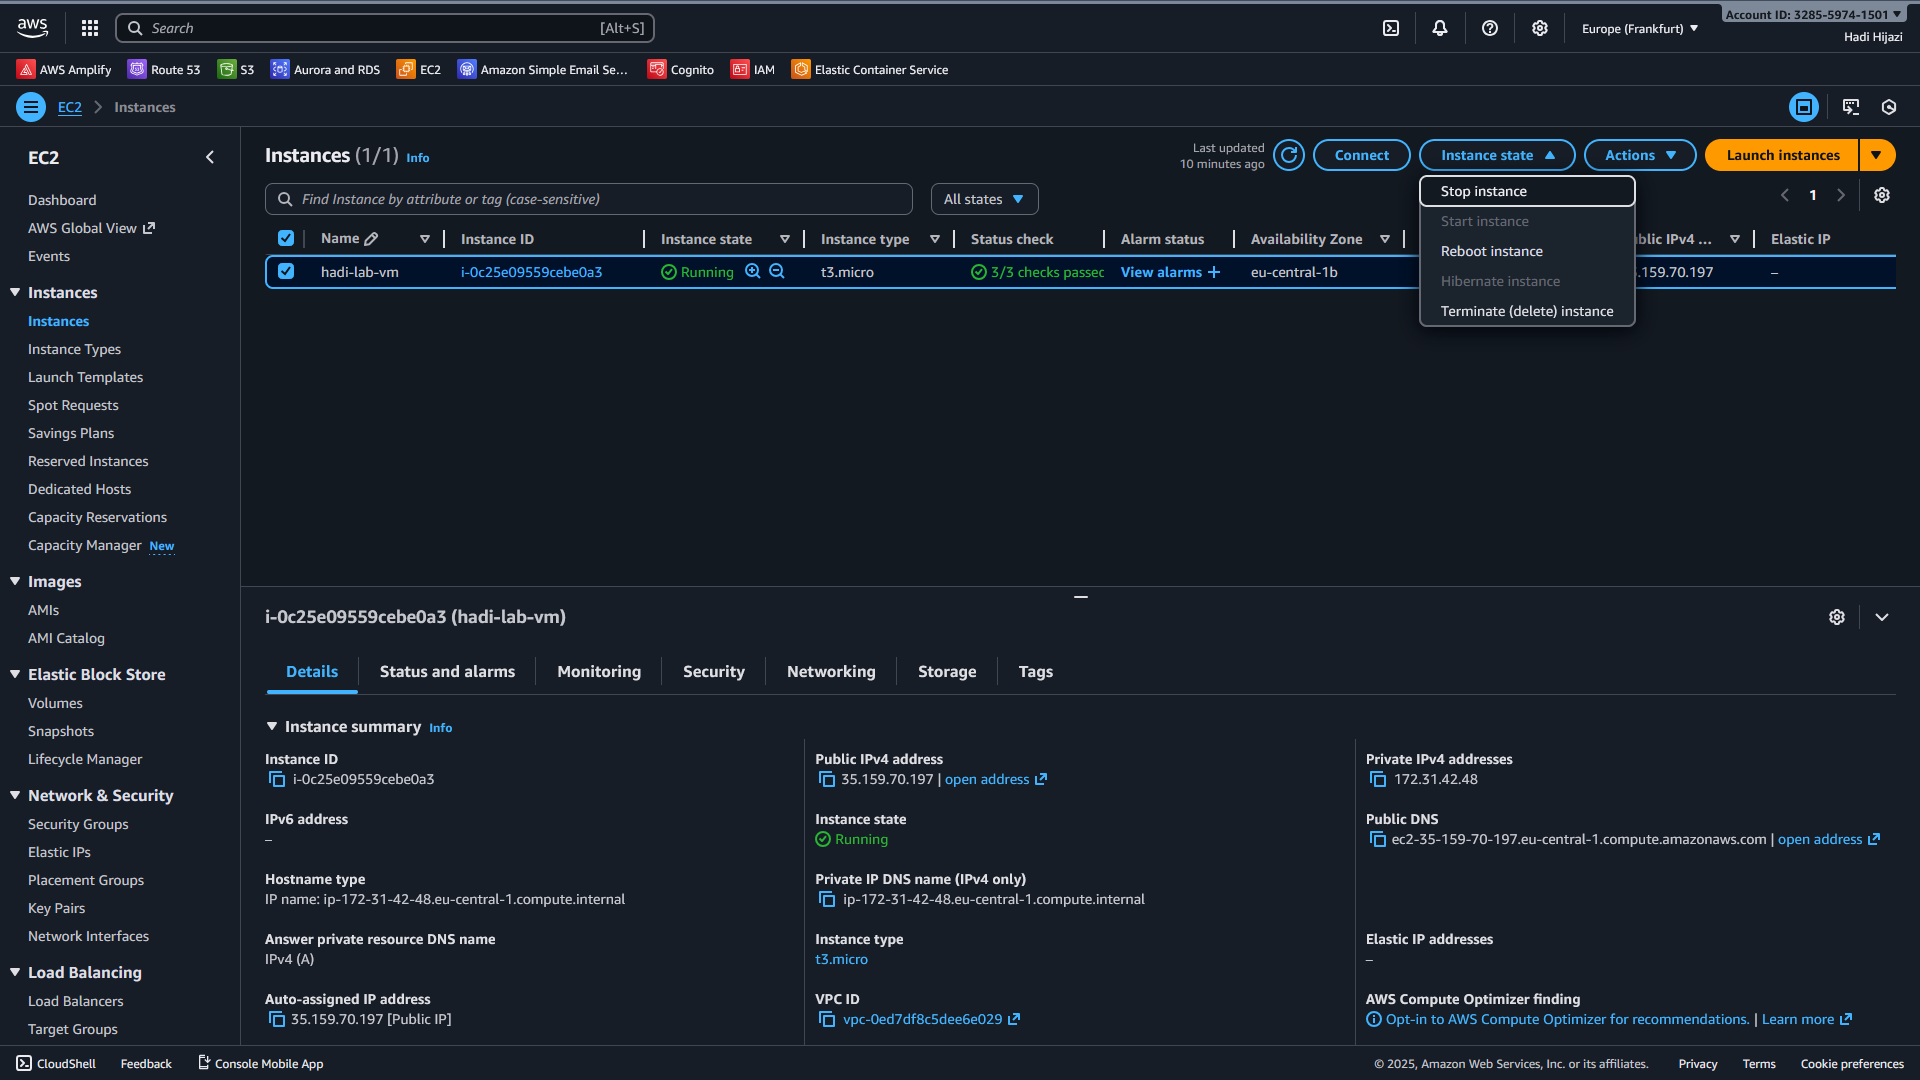
Question 6: What is the difference between stopping an instance and terminating it in EC2?
Write a brief explanation in your report.
Part II - MySQL Database on AWS RDS
In this part you will learn how to create and manage a MySQL database using Amazon RDS.
1. Configuration Options - Questions
Once the DB creation wizard is shown (or after you create the DB, you can re-open it in Modify mode), you will see several configuration sections.
-
Question 7: When you expand the configuration sections while creating or modifying the database, what are the main groups of options (e.g. Connectivity, DB instance class, Storage, Backup, etc.)?
-
Question 8: Briefly explain the first three groups:
- Connectivity → What does it control? Mention things like VPC, public access, and security groups.
- DB instance class and Storage → What do these options control? Explain how instance class relates to CPU/RAM and storage to disk size/IOPS.
- Backups and High availability / Multi-AZ → What is the purpose of automatic backups and Multi-AZ deployments?
Write your answers in your report.
2. Explore the RDS Database Dashboard
Once your instance is Available:
- Click on Databases in the RDS menu.
- Select the DB instance you just created.
You will see an overview page (dashboard) for that instance.
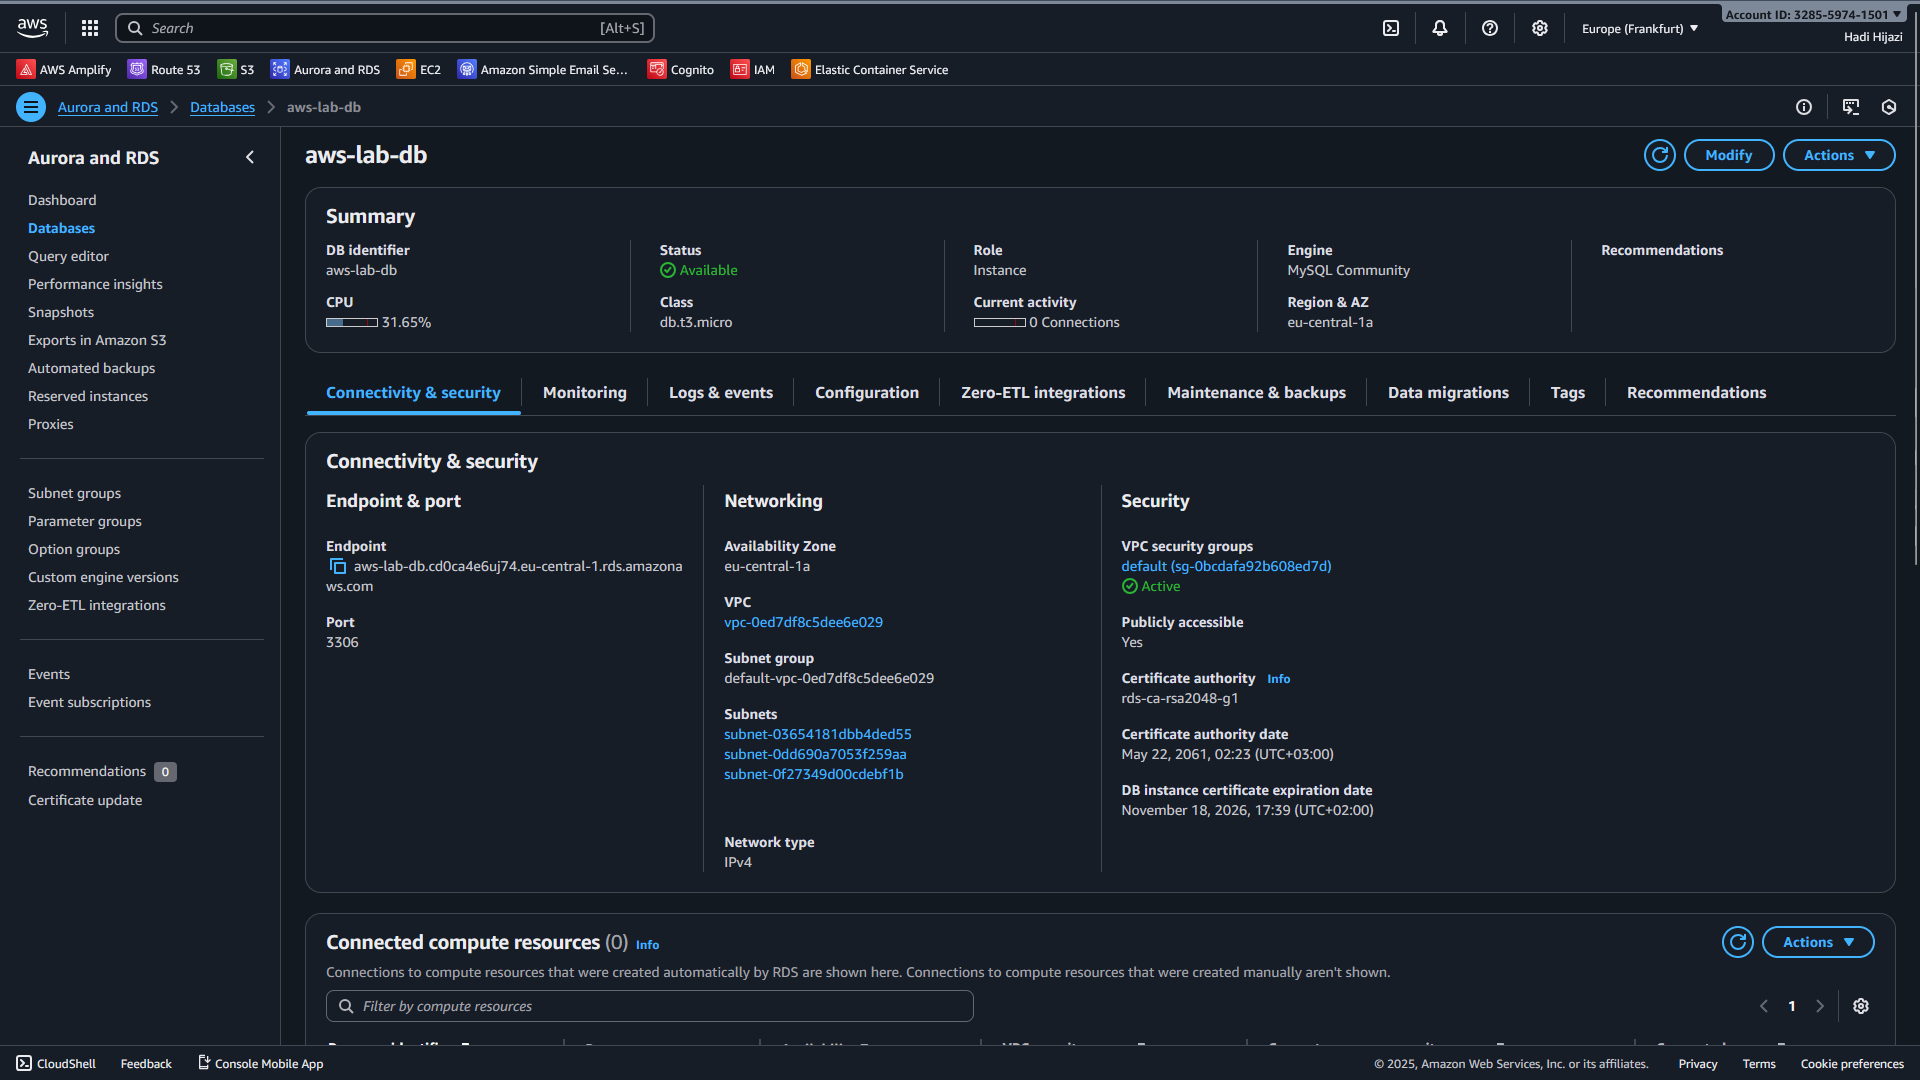
Answer the following:
-
Question 9: What are the main sections/tabs shown on the DB instance details page? (Examples: Connectivity & security, Configuration, Monitoring, Logs & events, Maintenance & backups, etc.)
-
Question 10: What is the Endpoint and Port of your instance?
- Who should know this information?
- Why is it important to keep it reasonably private and secure?
-
Go to the Connectivity & security tab:
- Look at the Connectivity section.
Question 11: What are the steps required to allow a user to connect to your instance from their laptop?
- Consider public access, security group rules (port 3306), and the client's IP address.
-
Go to the Configuration tab:
Question 12: What information about the master username, engine version, and DB instance class can you see here? How is this information used during the connection process and performance planning?
-
Go to the Maintenance & backups (or similarly named) section:
Question 13: Explain briefly:
- What are automated backups and how long are they kept?
- What are manual snapshots?
- What is a Multi-AZ deployment or read replica in RDS?
Write your answers in your lab report.
3. Connect to the Database from MySQL Workbench
In this step, you will connect to the RDS instance from your local machine using MySQL Workbench (or another MySQL client).
-
Open MySQL Workbench on your computer.
-
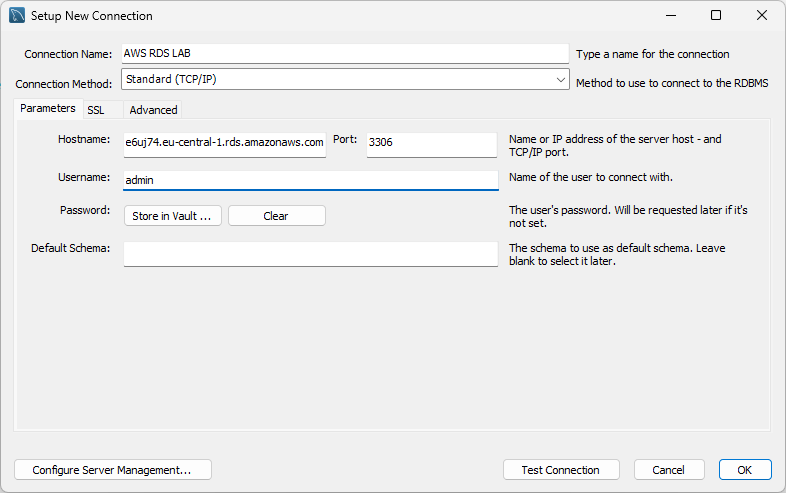
Create a new connection and fill in:
- Hostname: the Endpoint of your RDS instance (e.g.
your-db.xyz123.eu-central-1.rds.amazonaws.com). - Port:
3306(default MySQL port, unless you changed it). - Username: the master username you configured (e.g.
admin). - Password: click Store in keychain / vault and enter the master password you created.
- Hostname: the Endpoint of your RDS instance (e.g.
-
Test the connection.
-
If it fails, check:
- That the RDS instance status is Available.
- That Public access is enabled.
- That the security group attached to the RDS instance allows inbound traffic on port 3306 from your public IP.
-
-
Once the test passes, click OK to save and then double-click the connection to open it.
4. Create and Populate a Database
Inside MySQL Workbench, connected to your RDS instance:
- Create a new database (schema) for this lab, for example:
CREATE DATABASE lab_example;
USE lab_example;- Create one or more tables of your choice (or use a database provided by your instructor). Example:
CREATE TABLE students (
    id INT AUTO_INCREMENT PRIMARY KEY,
    full_name VARCHAR(100) NOT NULL,
    email VARCHAR(100) UNIQUE,
    major VARCHAR(50),
    created_at TIMESTAMP DEFAULT CURRENT_TIMESTAMP
);

INSERT INTO students (full_name, email, major) VALUES
('Alice Smith', 'alice@example.com', 'Computer Science'),
('Bob Johnson', 'bob@example.com', 'Mathematics'),
('Charlie Brown', 'charlie@example.com', 'Physics');- Run a few SELECT queries to verify the content:
SELECT * FROM students;
SELECT full_name, major FROM students WHERE major = 'Computer Science';
5. Reconnect and Observe Persistence
- Close MySQL Workbench completely.
- Re-open it and reconnect to your RDS instance.
- Run a SELECT query again on one of the tables you filled with data.
Question 14: What do you observe?
- Is your data still there?
- What does this tell you about how persistence works for an RDS database instance?
Write a short comment in your lab report.
Part III - Running a Dockerized PHP Application on EC2
In this part you will create a simple PHP application that connects to your RDS MySQL database, dockerize it, and run it on your EC2 instance.
1. Prepare the PHP Application
You will create a small PHP script that:
- Connects to the RDS MySQL database you created in Part II.
- Fetches student records from the
studentstable. - Displays them in a web browser.
The application structure will be:
php-student-app/
├── index.php      # Main PHP script
└── Dockerfile     # Docker configuration
On your local machine, create a new directory for the application:
mkdir php-student-app
cd php-student-app
Create index.php
Create a file named index.php with the following content:
<?php
<?php
// Database configuration
$host = "aws-lab-db.cd0ca4e6uj74.eu-central-1.rds.amazonaws.com";
$port = 3306;
$database = "labdb";
$username = "admin";
$password = "password";

// Connect to MySQL database
try {
    $conn = new PDO("mysql:host=$host;port=$port;dbname=$database", $username, $password);
    $conn->setAttribute(PDO::ATTR_ERRMODE, PDO::ERRMODE_EXCEPTION);

    // Query to fetch all students
    $stmt = $conn->query("SELECT * FROM students");
    $students = $stmt->fetchAll(PDO::FETCH_ASSOC);

} catch(PDOException $e) {
    die("Connection failed: " . $e->getMessage());
}
?>
<!DOCTYPE html>
<html>
<head>
    <title>Student List</title>
</head>
<body>
    <?php if (count($students) > 0): ?>
        <table>
            <tr>
                <th>ID</th>
                <th>Full Name</th>
                <th>Email</th>
                <th>Major</th>
                <th>Created At</th>
            </tr>
            <?php foreach ($students as $student): ?>
            <tr>
                <td><?php echo $student['id']; ?></td>
                <td><?php echo $student['full_name']; ?></td>
                <td><?php echo $student['email']; ?></td>
                <td><?php echo $student['major']; ?></td>
                <td><?php echo $student['created_at']; ?></td>
            </tr>
            <?php endforeach; ?>
        </table>
    <?php else: ?>
        <p>No students found in the database.</p>
    <?php endif; ?>
</body>
</html>
Important: Make sure to replace the hardcoded values (host, database, username, password) with your actual RDS endpoint and credentials before building the Docker image.
Create Dockerfile
Create a file named Dockerfile:
FROM php:8.2-apache

# Install MySQL PDO extension
RUN docker-php-ext-install pdo pdo_mysql

# Enable Apache mod_rewrite (optional, for clean URLs)
RUN a2enmod rewrite

# Copy application files
COPY index.php /var/www/html/

# Set proper permissions
RUN chown -R www-data:www-data /var/www/html

# Expose port 80
EXPOSE 80
2. Build and Push Docker Image
Instead of building the image on EC2, you will build it locally and push it to Docker Hub, then pull it from EC2.
2.1. Create a Docker Hub Account (if needed)
- Go to https://hub.docker.com and create a free account.
- Remember your Docker Hub username.
2.2. Build and Push the Image Locally
On your local machine, in the php-student-app directory:
- Log in to Docker Hub:
docker loginEnter your Docker Hub username and password.
- Build the image with your Docker Hub username:
docker build -t your-dockerhub-username/php-student-app:latest .Replace your-dockerhub-username with your actual Docker Hub username.
Question 15: What happens during the docker build process? List the main steps shown in the output.
- Push the image to Docker Hub:
docker push your-dockerhub-username/php-student-app:latestThis will upload your image to Docker Hub so it can be accessed from anywhere.
Question 16: How long does it take to push the image? What is the approximate size of the image?
3. Deploy to EC2
Now you will pull and run the Docker image on your EC2 instance.
3.1. Install Docker on EC2
Connect to your EC2 instance via SSH (as in Part I), then install Docker:
For Amazon Linux 2023:
sudo yum update -y
sudo yum install -y docker
sudo systemctl start docker
sudo systemctl enable docker
sudo usermod -a -G docker ec2-user
After adding your user to the docker group, log out and log back in for the changes to take effect, or run:
newgrp dockerVerify Docker is running:
docker --version
docker ps
Question 17: What version of Docker is installed on your EC2 instance?
3.2. Configure Security Group
Your EC2 security group must allow inbound traffic on port 8080 (or port 80 if you prefer) from your IP address (or from anywhere, for testing).
- Go to EC2 Console → Instances → select your instance.
- Click on the Security tab.
- Click on the security group link.
- Click Edit inbound rules → Add rule:
- Type: Custom TCP
- Port range: 8080
- Source: My IP (or 0.0.0.0/0 for testing)
- Save the rules.
Question 18: Why is it important to configure the security group to allow traffic on port 8080?
3.3. Pull and Run the Docker Container on EC2
On your EC2 instance:
- Pull the image from Docker Hub:
docker pull your-dockerhub-username/php-student-app:latestReplace your-dockerhub-username with your Docker Hub username.
Question 19: What happens when you pull the image? How does Docker know where to get it from?
- Run the container:
docker run -d --name student-app -p 8080:80 your-dockerhub-username/php-student-app:latest- Verify the container is running:
docker psYou should see your student-app container running.
4. Access the Application
Open your web browser and navigate to:
http://<your-ec2-public-ip>:8080
You should see the student list displayed in a table.
Question 20:
- Does the application successfully display the students from your RDS database?
- Take a screenshot of the browser showing the student list.
5. Architecture Overview
By completing this part, you have created a complete cloud architecture:
┌─────────────────┐
│   Your Laptop   │
│   (Browser)     │
└────────┬────────┘
         │ HTTP (port 8080)
         ▼
┌─────────────────────────────────┐
│   AWS EC2 Instance              │
│  ┌──────────────────────────┐   │
│  │  Docker Container        │   │
│  │  ┌────────────────────┐  │   │
│  │  │  Apache + PHP      │  │   │
│  │  │  (index.php)       │  │   │
│  │  └─────────┬──────────┘  │   │
│  └────────────┼─────────────┘   │
└───────────────┼─────────────────┘
                │ MySQL connection
                │ (port 3306)
                ▼
┌─────────────────────────────────┐
│   AWS RDS MySQL Database        │
│   (lab_example.students)        │
└─────────────────────────────────┘
Question 21: Describe the flow of data when a user accesses your application:
- What happens when you type the URL in your browser?
- How does the request reach your PHP application?
- How does the PHP application connect to the database?
- How is the response sent back to the browser?
Question 22: What are the advantages of using Docker Hub instead of building the image directly on EC2?
6. Cleanup
When you finish testing:
- Stop and remove the Docker container on EC2:
docker stop student-app
docker rm student-app- Optionally, remove the Docker image:
docker rmi php-student-app-
Stop or terminate your EC2 instance (see Part I, step 7).
-
Optionally, delete your RDS database instance if you no longer need it:
- Go to RDS Console → Databases
- Select your instance → Actions → Delete
- Uncheck "Create final snapshot" if this is just a lab
- Type the confirmation text and delete
Question 23: What are the cost implications of leaving EC2 instances and RDS databases running when not in use?
Deliverables
Submit a report containing:
-
Part I - EC2:
- Answers to Questions 1-6
- Screenshots showing your EC2 instance details and terminal session
-
Part II - RDS:
- Answers to Questions 7-14
- Screenshots of your RDS dashboard and MySQL Workbench connection
-
Part III - Docker on EC2:
- Answers to Questions 15-23
- Screenshots of:
- Docker build and push process
- Docker pull on EC2
- Running container (
docker ps) - Application in browser showing student data
- Brief reflection on what you learned about deploying containerized applications to the cloud
End of Lab